Hexapod
To Do List
Possible short term objectives and work in progress for the Hexapod:
- Measuring if the software is now really running real time using an oscilloscope
- Revise and test old gravity compensation by Jeroen (Rokus)
- Improve ground contact robustness (Rokus)
- Implement feedforward for the joint control
- Increase controller performance
- Use third order reference trajectories for gait implementation
- Convert spatial reference velocity and acceleration to joint reference velocity and acceleration for use in feedforward
- Implement model based feedforward body control (Marcello)
- Implement performance gaits
Installation
The installation assumes that Ubuntu 12.04 LTS is installed. If not you should install an Ubuntu version. Notice that the version of Ubuntu determines line 3 in the following code i.e. precise.
# Setup your computer to accept software from ROS.org
# 12.04 (precise)
sudo sh -c 'echo "deb http://packages.ros.org/ros/ubuntu precise main" > /etc/apt/sources.list.d/ros-latest.list'

# Set up your keys
wget http://packages.ros.org/ros.key -O - | sudo apt-key add -

# Installation
sudo apt-get update
sudo apt-get install ros-fuerte-desktop-full
sudo apt-get install ros-fuerte-orocos-toolchain
sudo apt-get install ros-fuerte-rtt-common-msgs

# Create your personal ros directory
mkdir ~/ros_personal

echo "source /opt/ros/fuerte/setup.bash" >> ~/.bashrc
echo "export ROS_PACKAGE_PATH=/opt/ros/fuerte/stacks:~/ros_personal" >> ~/.bashrc
echo "export RTT_COMPONENT_PATH=/opt/ros/fuerte/stacks/orocos_toolchain/install/lib/orocos" >> ~/.bashrc
echo "source /opt/ros/fuerte/stacks/orocos_toolchain/env.sh" >> ~/.bashrc
. ~/.bashrc

# Build SOEM
cd ~/ros_personal
git clone http://git.mech.kuleuven.be/robotics/soem.git
cd soem
git checkout origin/electric
rosmake soem

# Build hexapod
cd ~/ros_personal
svn checkout http://hexapod.wtb.tue.nl/svn/hexapod ./hexapod
roscd hexapod
rosrun rtt_rosnode create_rtt_msgs hexapod_msgs
rosmake

# You still should get
## (1) pr2_spring_transmission_example
## (2) orocos_components_dev
It is possible to put the code in a shell-file and run it.
SVN
The code can be found on: http://hexapod.wtb.tue.nl/svn/hexapod/.
To obtain an account you should contact Patrick van Brakel. To keep the svn clean i.e. no build, bin or lib files do the following:
sudo gedit /etc/subversion/config
Uncomment, by removing the '#' and add
global-ignores = *.o *.lo *.la *.al .libs *.so *.so.[0-9]* *.a *.pyc *.pyo
  *.rej *~ #*# .#* .*.swp .DS_Store lib build bin .tb_history msg_gen srv_gen
Hardware
The TU/e hexapod is a six legged robot with compliant joints. The compliance is obtained by using torsional springs between the actuators and the joints. The motors as well as the joints have absolute encoders. From the difference between these readings, the torsion in the springs can be calculated.
There are three main PCBs on the robot. The PCB inside the bottom of the robot (data acquisition module or DAM1) communicates with a computer. This can be the on board computer or an external pc. It is also equipped with an IMU that can measure pitch and roll angles, roll rates about three axes and acceleration along three axes. Furthermore, it receives power directly from the battery or external power supply and feeds it to the other boards.
Start-up
The PCB on top of the robot (DAM 2) translates the signals it receives from a controller to electric currents for the actuators. The middle PCB is the on board computer on which it is possible to run the robot's software.
To power the hardware, there is a 24V connection on the bottom of the robot. There is a possibility to connect one of the LiPo battery packs or alternatively to wire the robot to a laboratory power supply. When connecting a power supply, make sure the current is not limited too much (you need more than 3A, 10A should be enough. Alternatively, wiring a capacitor in parallel is an option). Once this is connected, the DAM 1 can be started using the small red button that is connected to two loose wires and after that, pressing the large white button on top starts DAM 2.
Connection to a computer, either the on board one or an off board pc, can be established using the "In" port on the piggyback EtherCAT board on the DAM 2. The "out" port should be connected to the "Out" port on DAM 1.
Software
The software on the SVN contains, among other things, a Gazebo model and control programs that communicate with the hardware through SOEM-drivers. A basic structure of the software is shown in the figure below.
Getting Started
The 'SOEM_hexapod_drivers' package contains a launch file named 'start.launch'. This runs the basic interface of the hexapod robot. From the Soem process, it is possible to, for instance, read the encoder signals or write commands to the actuators, using the Slave_1001 service. The Slave_1002 service is the interface service of the IMU.
The 'Hexapod_Launch' package contains much more launch files, which can be used for various purposes indicated in the names of these files. These launch files start orocos deploy scripts, which in turn may call other scripts.
Some of the deploy scripts contain hard coded paths. Make sure to substitute them with your own. A shell file, rename.sh, was written to automatically do this, but be sure to change the path in this file to your own path. It is located in hexapod_launch. Another possible solution for the future is to seperate the scripts more clearly and call them in a launch file, in which ROS launch syntax can be used to avoid hard coding paths.
Launch files description
controller_test.launch: loads the basic components to create a loop with encoder, actuators, safety module, soem drivers, joint error and respective signal routing with a zero reference as input.
OROCOS components
Hexapod Encoder
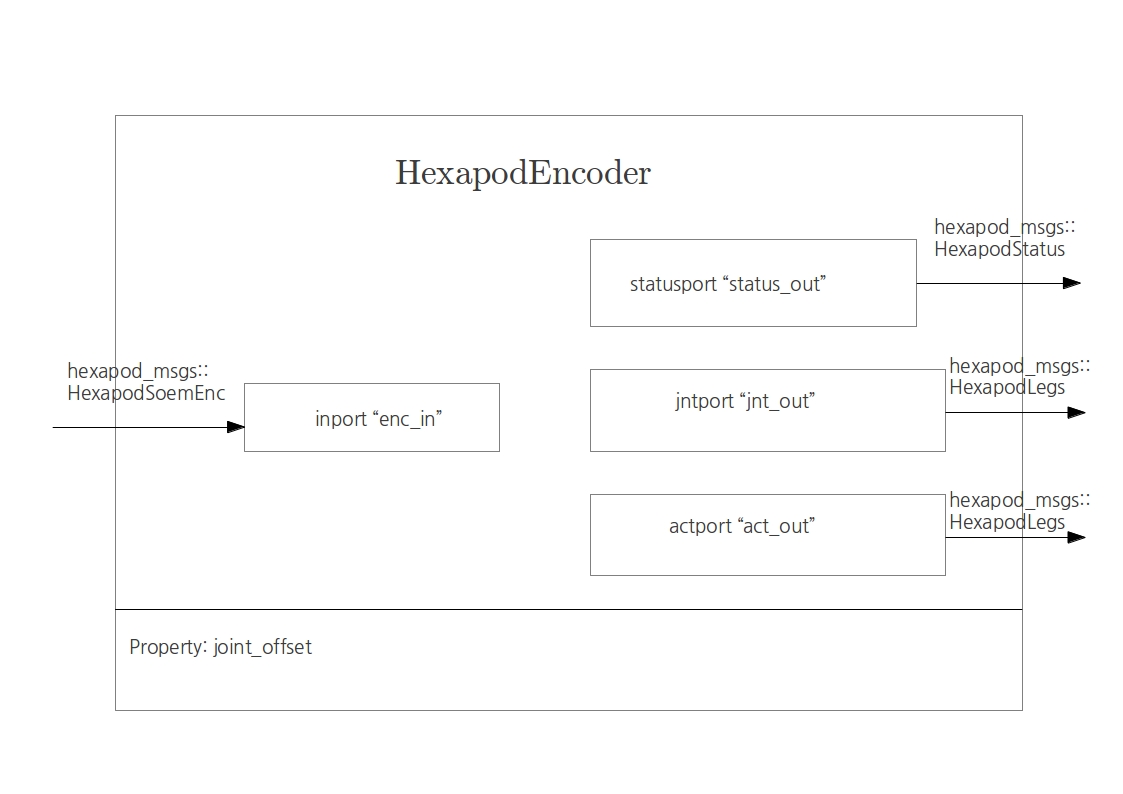
This is the encoder component. It reads a message coming from the encoder port on the Soem board and outputs three different messages: a status, necessary for the actuators to be enabled, and a joint and actuator reading.
Hexapod Actuator
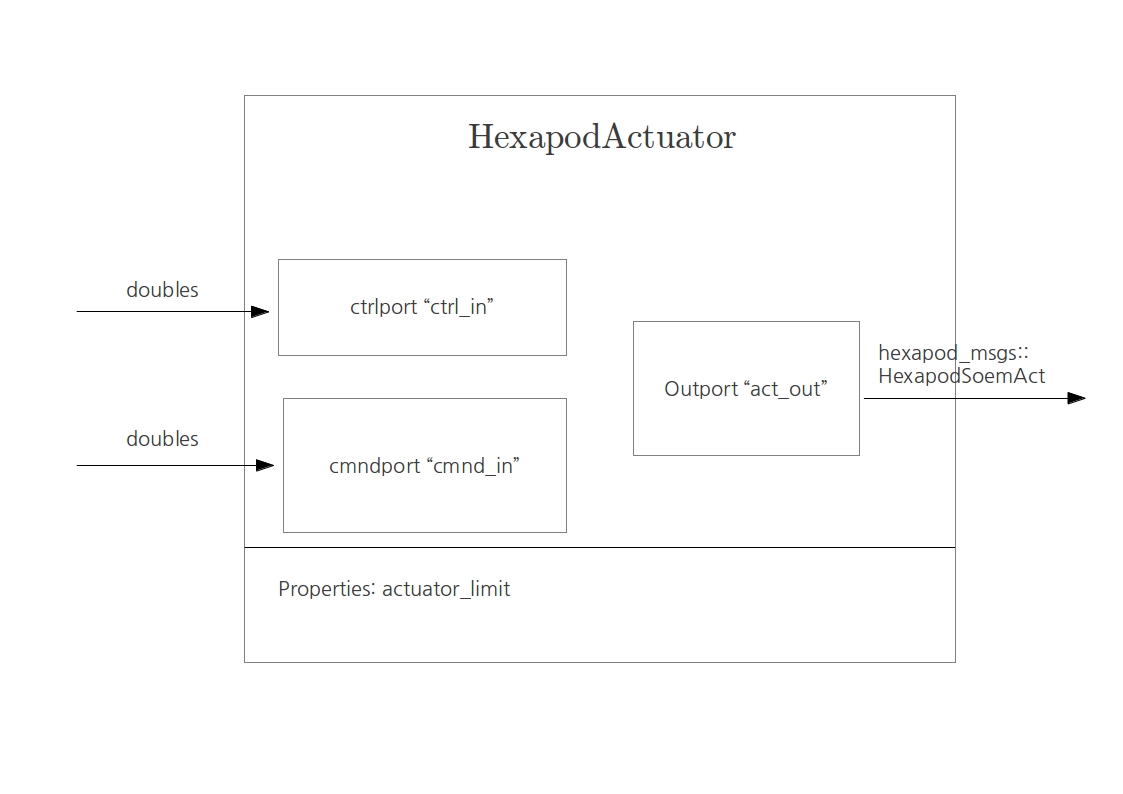
This is the actuator component. It reads two messages at its input ports: the command message, that can be either 0 or 1, enables the actuators. The control message is what the motor is receiving and it's written to the output port of the component, connected with the Soem board.
Hexapod Safety
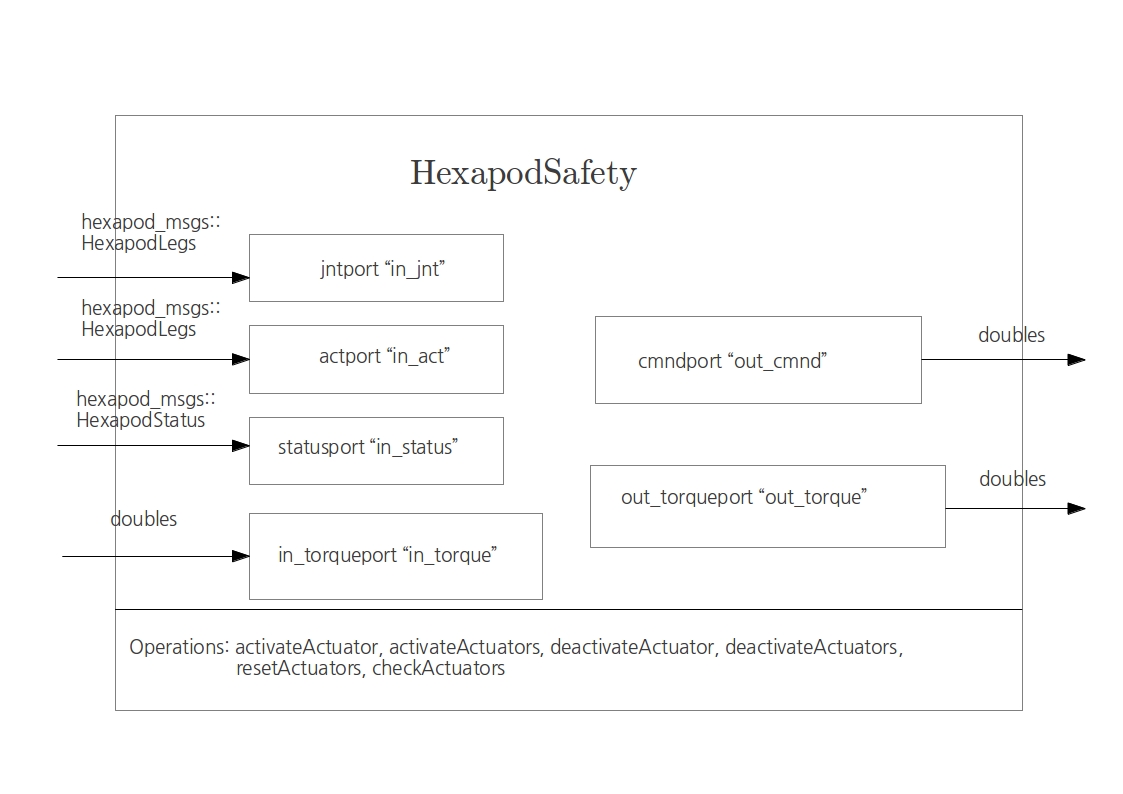
This is the safety block that handles the limits in the joints revolution such that motors and cables are not damaged. It enables/disables the motors according to that.
Joint Error
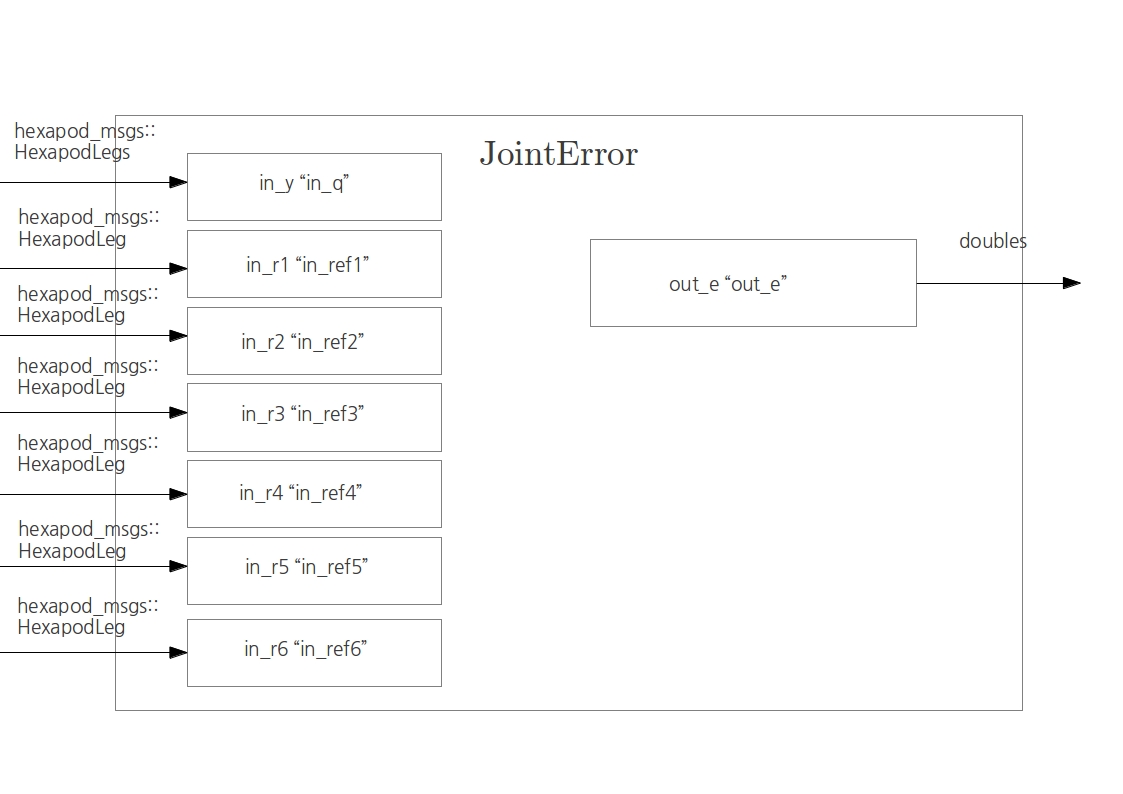
This component is the error block. It has 6 inputs for the six legs references, plus one additional input that reads the encoder to recover the actual joints positions. It computes the error and copies it to the output port.
Hexapod IMU
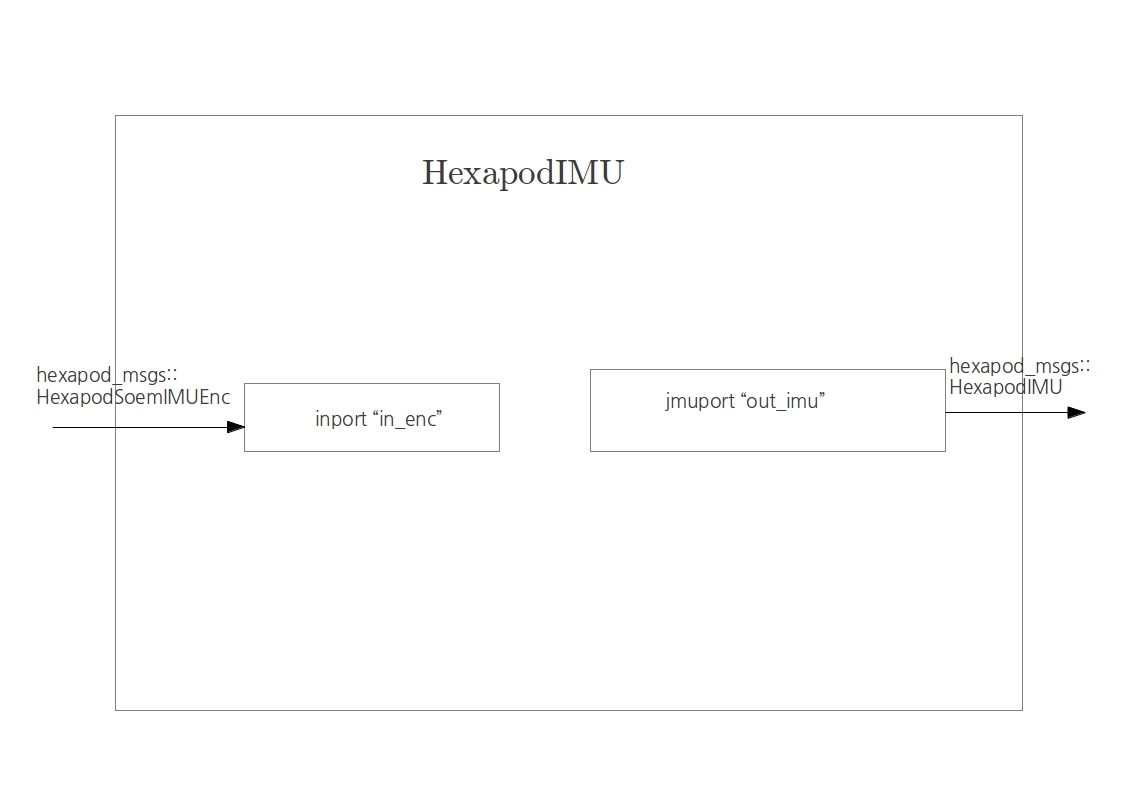
The IMU component is connected with the Soem Slave_1002 encoder port, and gives as output the roll and pitch angles plus three components of acceleration.
Hexapod Height
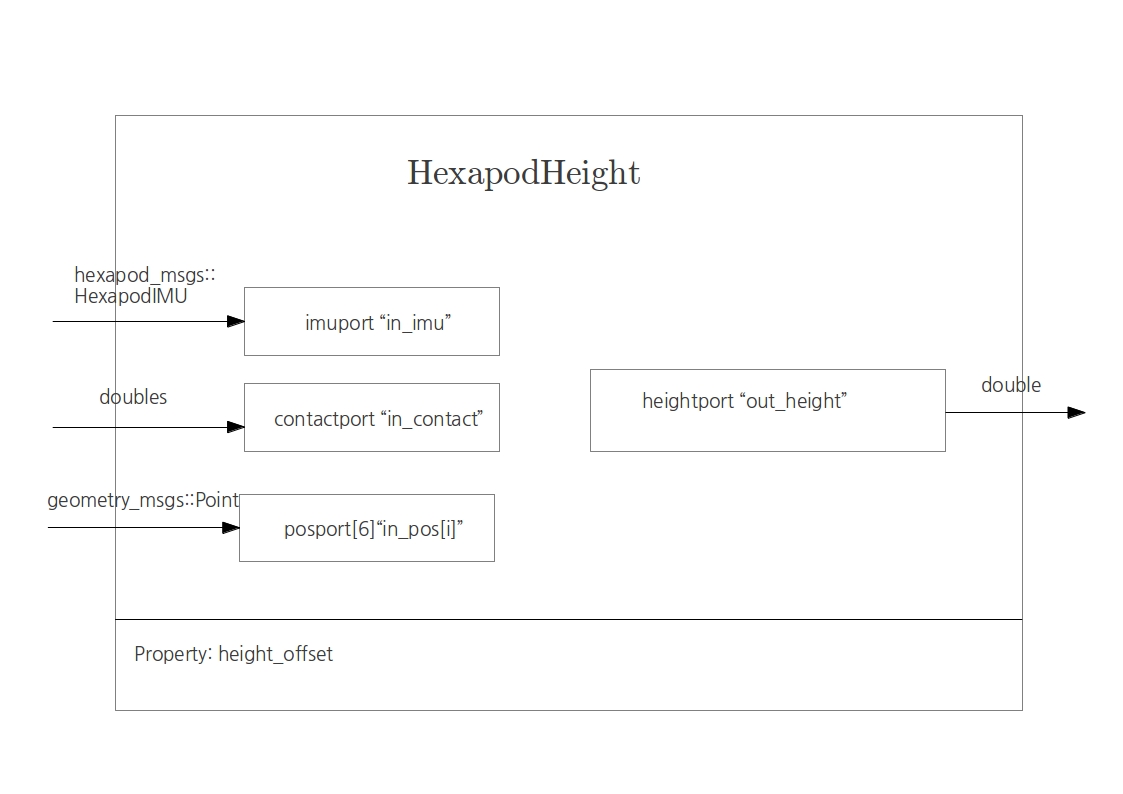
This component roughly computes the height of the robot from an average of the tip positions.
Troubleshooting
- The Soem master could not initialize on eth1
- Make sure that you are connected to eth1 or otherwise change it in the *.ops file.
To list the network ID's form your PC use the following command in the terminal:
ifconfig
- If the setcap cannot be found.
install the setcap
sudo apt-get install libcap2-bin
- If the followin error occurs:
[ ERROR ][Soem] Could not initialize master on eth1.
Set the permission for the deployer-gnulinux such that it can use ethernet.
roscd ocl
cd bin
sudo setcap cap_net_raw+ep ./deployer-gnulinux
Useful references
Some interesting tips and tricks can be found on [1]. Regarding realtime performance, also look at [2]. For these links, an account for the servicerobot wiki is needed. This can be obtained with the AMIGO team.
Reports
| Boris Mrkajic | Systems and Control Library Development | |
| Max Baeten | Control of the Philips Experimental Robotic Arms using EtherCAT | |
| Niek Bilterijst | Low Level Spindle Control of AMIGO | |
| Tim Clephas | Design and control of a service robot - The birth of AMIGO | |
| R. Woering | Simulating the "first steps" of a hexapodal robot | |
| Jeroen Willems | Control of a hexapodal robot |

