Embedded Motion Control 2019 Group 8
Group Members
| Name | Student ID | |
|---|---|---|
| Stan (C.M.) den Hartog | 0953184 | c.m.d.hartog@student.tue.nl |
| Elise (E.D.T.) Verhees | 0950109 | e.d.t.verhees@student.tue.nl |
| Rob (R.J.G.) Dorussen | 0968849 | r.j.g.dorussen@student.tue.nl |
| Gosse (G.) Bijlenga | 0950642 | g.bijlenga@student.tue.nl |
| Max (M.J.) van Haren | 0953564 | m.j.v.haren@student.tue.nl |
Introduction
The goal of the course Embedded Motion Control (EMC) is to design software such that the robot (PICO) can perform tasks autonomously in a real life setting. The implementation of the software skills to fulfill real-life robotic tasks in real-time situations, takes into account both planning and basic programming. In order to see how well the objective is reached, PICO is tested in the following two challenges.
The first challenge is the Escape Room Challenge, in which the robot is placed in a room with a single exit with a random orientation. Upon placement, the robot should autonomously find the exit, move towards the exit and exit the room without touching the surroundings. The second challenge is the Hospital Challenge, in which the robot should autonomously function within a hospital, based on a specific map. The goal for the robot is to go from cabinet to cabinet, while on the way encountering random disturbances as deemed normal in a hospital.
This wiki page will give an overview of the designs for both the Escape Room and Hospital challenges.
Escape Room Challenge
Design Document
For the Escape Room Challenge a design document has been made. This document contains a description of the requirements, specifications, components, interfaces and functions. The file can be found here: File:Design document.pdf
Escape Room Execution
A short summary of the actions the robot will undertake can be seen in the State machine showed below.

Wall Following
Since the most robust solution is to follow a wall, this is chosen to be implemented first. The decision has been made to keep the wall on the left side of PICO. The wall following function works as follows. PICO checks if there is a wall in front of him. This is done by checking if the minimum distance in a small cone in front of PICO is lower than a certain threshold. If there is a wall in front of PICO it realigns with the wall using the angle at which it found the minimum distance. Then the robot checks what the minimum distance is in a cone on the left side. If this distance violates a minimum threshold, PICO will strafe away from the wall. But if the minimum distance on the left is too big, PICO will strafe towards the wall. If the minimum distance of the left and front cone are fine, a smaller cone on the left will be checked. If every distance in that small cone larger than 1.2 meters, PICO recognizes this as an exit. It will move a little bit further and then go into the 'exit'. Good results are achieved in the 2 random maps that are shown in Figure 2 and 3.
Scanning for an exit
After that, the robot has been made a bit 'smarter'; It will first scan the room for an exit. PICO checks the difference between two LRF measurements net to each other. If this distance is larger than 0.5 meter, PICO recognizes it as an exit. If an exit is found, it will stop rotating, rotate a bit back, to make sure it will head for the left wall, start heading for the exit, and then continue with the wall following procedure to exit the corridor. The result using both wall following and scanning for an exit can be seen in Figure 4.
Figure 2: Test 1 in simulator using wall following only.
Figure 3: Test 2 in simulator using wall following only.

Figure 4: Test 1 in simulator using wall following and scanning for an exit.


Escape Room Result
The result in the escape room challenge is that PICO was able to get to the corridor, but it was not able to finish. Halfway through the corridor, PICO recognized another 'exit' and bumped into the wall. The final run can be seen in Figure 5.

Evaluation of the Escape Room
The escape room challenge clearly showed robustness is key in solving robotics problems.
First of all, PICO was not able to detect the exit correctly initially. This is because the difference between adjacent measured distances has to be an exit, if and only if the walls have no discontinuity's. However, this was not the case. Therefore, this assumption was wrong and the exit detection did not work. In order to fix this, it should be checked whether the opening in the wall is big enough. In order to improve the functioning of PICO, the hypothesis whether something is simply a hole in the wall, or an exit, should be tested more thoroughly before acting upon the measured values. This could indicate the need for either a certain memory in the world model or testing a larger range of the LRF.
Next to that, Figure 5 shows the robot is stuck in the corridor. This can be explained since there was a wall place skewed in the corridor. The robot saw this wall in front of him and realigned. Then the distances in the small cone on the left were all greater than 1.2 so therefore the robot thought it was located at an outside corner again. Thus it drove forward again without checking the minimum distance in front of him and rode into a wall. This problem could be fixed by either implementing the monitor when the robot wants to get in front of the exit or by changing the way PICO recognizes the exit, thus again implementing different hypotheses and building a certain memory in the world model or testing a larger range of the LRF.
Implementing the ideas itself did not seem a big issue, however robustly solving these problems did. In the hospital challenge, the effort has been made to tackle all the problems as robustly as possible.
Hospital Challenge
Hospital Challenge Brainstorm Session
To prepare for the hospital session, a brainstorm session is done and several new requirements, specifications, functions and components are thought of.
The following diagram is the result of this brainstorm session.

Components of the Hospital Challenge
The components seen in in Figure 6 are explained in this section.
Localization

- placeholder
- placeholder
- placeholder
- placeholder
- placeholder
- placeholder
- placeholder
- placeholder
- placeholder
- placeholder
- placeholder
Route planning

As in this challenge our focus lies on robustness and not on the speed at which the task is fulfilled, throughout the map there are waypoints that are placed at convenient places. These waypoints can be seen in Figure x. The waypoints are placed in such a manner that the robot could drive in straight lines from waypoint to waypoint, thus at corners and corridors or doors. In order to decide the order of the waypoints for the path of the PICO robot, some paths are hardcoded. Each path starts in the hallway and goes to each cabinet, as it is assumed that each cabinet will be accessible through the corridor. For each cabinet, there are multiple paths that are hardcoded, and PICO cycles through these paths if obstacles are found to be blocking the path in such a manner that continuing along this path would be impossible.
State machine

In Figure 7 the state machine can be seen. The state machine cycles through the steps of route planning and actuator control in order to fulfill the task. At the start of each assignment, there is an initialization state where the robot starts up and checks functionality. Next, it will place itself using the localization, where he will determine his route to the next cabinet. Then, the robot will rotate itself in such a way that a straight path can be made towards the next waypoint, after which PICO will drive towards the waypoint.
Once a waypoint is reached, there are three options. The first option is that a next waypoint is to be gone to, after which the robot will orient itself again. The second option is that the robot has arrived at a cabinet and is required to orient itself to be aligned with the cabinet and afterwards determine a new route, towards the new waypoint. The third option is that a new route is required, due to obstacles, doors, etc.
Throughout the state machine, localization and object detection/avoidance are running, which both override the state machine in importance. If localization cannot take place, the robot will pause the state machine in order to regain the location. If an object is detected and required to be avoided, the state machine will be paused in order to keep PICO from touching foreign objects.

Object detection/avoidance
In order to be able to drive from waypoint to waypoint without any collisions, there are two different options hardcoded. The first option is when driving in open space and the second options is when driving through a narrow opening, such as a door. Each case will be explained below.
Open space object avoidance
In the open space, objects can be encountered, which could be either dynamic objects, such as people walking around, and static objects, such as cupboards. In order for PICO to know how to act upon sensing an object nearby, an area around PICO is taken as seen in Figure x.
If an object is in the green space, which is more than half a meter away from PICO, PICO will not react at all as there is no interference with the foreseeable path of PICO. Once an object enters the yellow space, PICO pauses and tests hypotheses. The first hypothesis to be tested is whether it is a static dynamic object. If the shortest distance to the sensed object stays within a minimum angle difference and minimum difference in shortest distance, the object is assumed to stand still. If the object is not in the direction that PICO is desired to move in, PICO will continue on its path. If the object is in the way, PICO will sense the quadrant where the static object is in, and move to the open space in the opposing quadrant, until the object is no longer within the circle and the path will be free. If PICO cannot find a way around the static object after 3 trials, PICO will delete the waypoint for this trajectory and continue by finding a different path.
The second set of hypotheses to be tested is the direction of the dynamic object. PICO measures the angle and magnitude of the minimum distance to the object and saves this in the world model. PICO pauses for a second and measures the magnitude and angle of the minimum distance again. If the difference in angle of the minimum distance differs minimally, whereas the minimum distance decreases/increases, the hypotheses can be made that the object is moving closer/further away. If the object is moving closer, PICO will check which quadrant the object is entering, and check for free space in the opposing quadrant. If there is free space, PICO will move into that quadrant until the threat is no longer moving towards PICO. If the object is moving further away, PICO waits until the object exits the circle and continues driving. Next, if the difference in angle of the minimum distance changes after the waiting time, whereas the minimum distance can change, the object is assumed to move across from PICO, without hitting PICO. PICO then waits until the object moves across from the path that PICO desires and PICO then continues driving.
Once an object crosses the yellow circle, by for example unexpected behavior by dynamic objects, and enters the red circle, PICO does not test hypotheses. PICO checks in which quadrant the object enters, and checks the minimum distance in the opposing quadrant and drives there if said quadrant is free. If the opposing quadrant is not free, PICO will drive backwards until the object is no longer in the red circle, and until there is free space in the opposing quadrant. Here it is assumed that the path that PICO just travelled is free to drive backwards.
Narrow way object avoidance
Once in between doors, the second option is utilized. In this case there is only a small circle as seen in Figure x. In this case the red zone is slightly larger than the red zone as in the open space in order to give more time to build hypotheses. Once an object enters the red zone, quick hypotheses are tested as in the yellow circle of the open space. Once an object enters the space, a very short time is waited in order to determine whether an object is static or dynamic. If the object is dynamic, the quadrant is tested and PICO moves into the opposing quadrant if the quadrant is free, else PICO moves backwards. If an object is static, it is tested whether is a door, by testing whether there are areas where the maximum distance seen when facing towards the wall is larger than expected. If it is a door, PICO requests for the door to be opened. If it is a static object in the way, the waypoint is deleted for this trajectory and a new path is decided. Once an object enters the circle on the right or left, PICO moves in the opposite direction in order to stay around the middle of the doorway, to avoid collision with the walls.
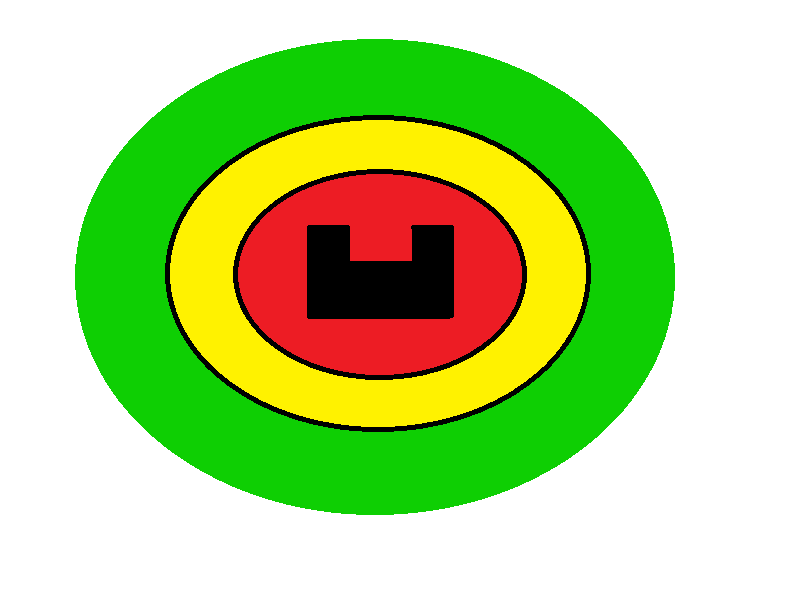
Figure x:The different areas around PICO once in an open space.
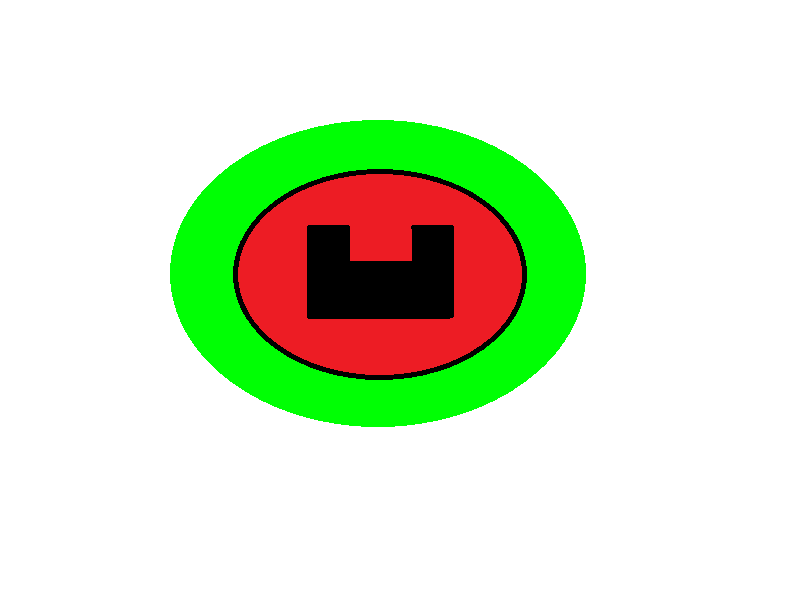
Figure x:The different areas around PICO once in a narrow space.


Motor Control

Due to investigations it was already clear that no complicated control was necessary. To make the movements of Pico slightly more smooth, a gain has been implemented.
The function furthermore returns the relative distance travelled each sampling interval.
- placeholder
- placeholder
- placeholder
- placeholder
- placeholder
Simulation results of the hospital challenge
Two simulation examples have been made for the hospital challenge. One nominal situation and one situation where clutter objects are apparant on the map. These can be seen below.

Figure x: Simulation of Pico in nominal environment.
Figure x: Simulation of Pico in cluttered environment.


Results of the Hospital challenge
The official hospital challenge, with all static objects, doors and dynamic objects included, has been tried twice. The trials can be seen below.
- Trial1 group8.gif
Figure x: Trial one of the Hospital Challenge
- Trial2 group8.gif
Figure x: Trial two of the Hospital Challenge
The results were as expected, because the simulation results already showed there were flaws in the localization when the deviation from the nominal situation was too large. A run with only a dynamic object and no doors or static objects has been done right after the challenge. As expected, Pico was able to fully complete this challenge, as can be seen below.
Evaluation of the Hospital challenge
As can be seen in the trial runs in the Hospital Challenge, the main fault in the concept lies within the localization. As the localization is implemented, it runs every iteration and calculates the position again. As the robot reaches the area where the 'couch', 'cupboard' and 'door' are placed, the robot is unable to locate itself, even though PICO has access to its location from a previous time step, which is reliable. If the software for PICO would have been built to trust the odometry when there is an unsure localization for PICO until a new trusted location for PICO is available, this would have improved the robustness of PICO greatly. If PICO did not know its location as built now, PICO would spread particles all over the map in order to try locate itself, which causes great disturbances for the localization, thus creating a position on the map with a large error, and thus uncertain path planning.
Next to this, during the Hospital Challenge, PICO is lifted and put inside the right room, which it recognized. However, the path planning was designed in such a way that PICO had to follow a list of waypoints until it got stuck. Once regaining its location in the right room, PICO's path planning intended for PICO to drive back to the waypoint on the way to the cabinet. As an improvement, the path planning should have taken into account the actual location and closest distances to different waypoints and planned its route accordingly.
Thirdly, the localization did not take map known disturbances into the map, which could have greatly helped. Adding static disturbances could increase robustness, as PICO has gathered more information of its surroundings. This could have placed the knowledge that an object, such as the 'cupboard', is in the hallway and will anticipate this now known disturbance during future encounters. This could have helped during localization in further iterations and thus strengthen the knowledge of its location.
Lastly, PICO bases its hypotheses of off short time periods. In order to increase robustness, PICO should test certain hypotheses, such as the hypothesis whether a static object is truly static throughout the entire Hospital Challenge or is static for certain periods of time, multiple times and should have the ability to turn certain waypoints on and off.
NOTE: maybe different way of path planning to increase scalability?
Video
<iframe width="560" height="315" src="https://www.youtube.com/embed/D3zYT49ZT44" frameborder="0" allow="accelerometer; autoplay; encrypted-media; gyroscope; picture-in-picture" allowfullscreen></iframe>
Code Snippets
Group Evaluation
Deliverables
- File:Design document.pdf
- File:Presentation EscapeRoom Challenge.pdf
- File:Presentation Hospital Challenge.pdf