Embedded Motion Control 2018 Group 5
Group information
| Name | Student number | |
|---|---|---|
| M.J.W. Verhagen | 0810317 | m dot j dot w dot verhagen at student dot tue dot nl |
| L.W. Feenstra | 0847751 | l dot w dot feenstra at student dot tue dot nl |
| A.J.J. Steinbusch | 0903892 | a dot j dot j dot steinbusch at student dot tue dot nl |
| J.T. Galen | 0897620 | j dot t dot v dot galen at student dot tue dot nl |
Introduction
This project is part of the course Embedded Motion Control in which software is developed and applied to autonomously control a robot in real-life. The project consists of two challenges: the Escape Room challenge and the Hospital challenge. The Escape Room challenge will be an intermediate challenge that serves as preparation for the final challenge which is the Hospital challenge. In both challenges a robot has to fulfill its task autonomously. To begin with, an initial design is made in which the requirements and specifications of the two challenges are touched upon, functions that the software will be divided in, the components of the robot that will be used with their specifications, and the interfaces that will be used.
Initial Design
In this section, the initial design is discussed. A list of requirements, functions, components, and specifications is presented. Finally, the communication of the functions among each other is visualized using an interface, which clarifies the structure of the software that will be implemented.
Requirements
There are two competitions in which PICO will be active. Therefore, the requirements are split up in general requirements, which are of importance for both competitions, requirements considering the Escape room challenge, and requirements that concern the Hospital challenge.
General requirements that hold for both challenges are:
- PICO must move autonomously.
- PICO is not allowed to bump into walls.
- PICO gets two opportunities to perform the entire task.
- PICO cannot stand still for a period longer than 30 seconds.
- The total time limit for PICO to accomplish its tasks is 5 minutes.
- The challenges must be finished as quickly as possible.
- PICO should have a minimal distance from the wall of 25 cm from its center point.
- The software must be easy to set-up.
Additional requirements concerning the Escape Room challenge are:
- Finding the corridor.
Additional requirements concerning the Hospital challenge are:
- PICO has to explore the rooms and build a map.
- PICO has to be able to park backwards to the wall behind the starting position.
- PICO must be able to recognize a change in the map and by means of that find an object in one of the rooms.
- PICO must stop and stand still close to the object after finding it.
Functions
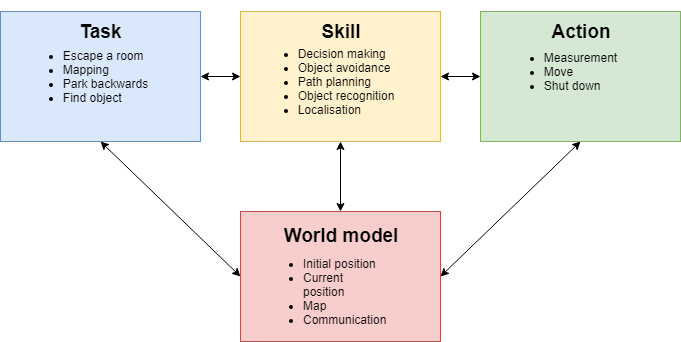
Here, the functions that will be implemented in the software of PICO are presented. The functions are split up in different categories, namely Task, Skill, Action and World model.
Task: Contains the main goal that the robot needs to fulfill. For the first challenge this is escaping the room. For the second challenge this is mapping the hospital, parking backwards and subsequently finding an object.
- Escape a room
- Mapping
- Park backwards
- Find object
Skill: For each task certain skills are needed. When PICO is escaping the room or mapping the hospital it will have to make decisions where to go next. It can choose different directions and/or rotations. While driving around in the room or hospital PICO has to recognize exits, walls, corners and the object that needs to be found while avoiding hitting any walls or the object. PICO also has to be able to know where it is while driving through the hospital and plan a certain path to find the object.
- Decision making
- Go left
- Go right
- Go straight ahead
- Go backwards
- Rotate
- Object avoidance
- Path planning
- Object recognition
- Detect exit
- Detect wall
- Detect corner
- Detect object
- Localisation
Action: To every skill certain actions correspond such as measurements, movements or shutting down.
- Measurement:
- Read encoder
- Read LRF
- Move:
- Stop
- Translate:
- Left, Right, Back, Straight ahead or x and y direction
- Rotate:
- Direction and angle or +/- 90/180/360 degrees
- Shut down
World model: Contains the map of the environment, the starting position of the robot, the current position of the robot and a function that can obtain this information from other models and can send this information to other models.
- Initial position
- Current position
- Position of the walls, exits and corridors
- Communicates with functions in other models
Components
The robot that will be used in this project is PICO which is a telepresence robot from Aldebaran. PICO moves on omni-wheels so that it can move in all directions and it can rotate along the z-axis. It contains a Laser Range Finder (LRF) to detect the walls and objects. Also, PICO is provided with wheel encoders to estimate the change in distance from its starting position.
PICO runs on an Intel i7 on Ubuntu 16.04. A software layer has been created on the Robot Operating System to simplify its use. The software of this project will be programmed in C++.
Specifications
A list of specifications is made regarding PICO and the environment in which PICO will be active. First, the specifications regarding PICO are shown, followed by the specifications that concern the Escape Room challenge and the hospital challenge.
Specifications of PICO:
- The maximum translational speed is 0.5 m/s.
- The maximum rotational speed is 1.2 rad/s.
- PICO is approximately 40 cm wide.
- Laser Range Finder has a range of -135 to 135 degrees with 1081 data points.
Specifications concerning the Escape Room challenge are:
- PICO has escaped the room when its entire rear wheel is across the finish line.
- The shape of the room is rectangular and the dimensions of the room are to be revealed at the start of the challenge.
- The start position of PICO will be at a random position in the room.
- The orientation of the corridor will be approximately perpendicular to the wall and the wall on the far end of the corridor will be open.
- The walls might not be perfectly straight, nor perfectly perpendicular and parallel to other walls.
- The width of the corridor will be in-between 0.5 and 1.5 meters.
- The finish line will be more than 3 meters into the corridor to give PICO some more time to align itself with the walls of the corridor.
Specifications concerning the Hospital challenge are:
- PICO's starting position will be in the hallway.
Interfaces
Escape room Challenge
In the Escape room challange PICO was placed on an arbitrary location in a rectangular room from which it had to escape through a corridor. This had to be done as fast as possible.
Wall follower
In order to complete this challenge, a so-called Wall follower algorithm was built and implemented. The steps that the algorithm makes in order to complete the challenge are as follows:
- Drive to the right until a wall is detected at the right side,
- Follow this wall by driving forward until a wall is detected,
- If the distance to the right wall becomes larger than a predefined threshold, compensate by driving sideways to the wall,
- When a corner is detected ahead, rotate 90 degrees to the left and align to the wall perpendicular to the previous wall,
- If the corridor is detected by an increase in distance measured at the wall side (defined by a certain threshold), PICO will drive another 25 cm forward and then rotate 90 degrees to the right,
- PICO will drive forward and then align to the right wall again, allowing it to exit the room.
For detection, PICO uses sensor-data of the sensors located perpendicular to its forward driving direction. These sensors are used to find the distance to walls at its left and right side, defined as LeftDistance and RightDistance respectively. The sensor that is aligned with the forward driving position is used to find the distance to to a wall that is in the forward driving direction, defined as ForwardDistance. The detection of a corner as described in step 5 is done by looking at ForwardDistance and RightDistance. When both of these distances become lower than a predefined threshold, a corner must be present at the right side, and therefore, PICO should rotate to the left. By using this algorithm, PICO is able to find the corridor of the room and escape the room.
Testing
The testing sessions with PICO were used for testing the algorithm and fine tuning some parameters in the model, such as velocities, rotational velocities and required minimal distances to walls. During the testing, it was found that there is a large difference between the simulation and reality. First, it was concluded that the odometry of PICO should not be trusted too much for localization and moving around. This could be noticed at the 90 degrees rotation that was used. The actual rotation PICO made had a noticeable offset. A possible solution to this problem was using the wall at the side to determine if PICO is aligned with the wall by using additional sensor data. This solution was implemented and tested in the simulation. In the simulation, the solution worked quite well for making the corners, but it also caused some unexplainable and unwanted behaviour. Due to a lack of time, no solution to this problem could be found and therefore, this was not implemented for the Escape room challenge. Another flaw that occurred during testing was that PICO did not always detect the wall at its right side in step 1, and because of this, PICO hit the wall. This did not happen in any of the simulations, and it remains unclear why this happened during testing. Despite these two problems, PICO was able to get out of the room once during testing.
VIDEO SIMULATION
The Challenge
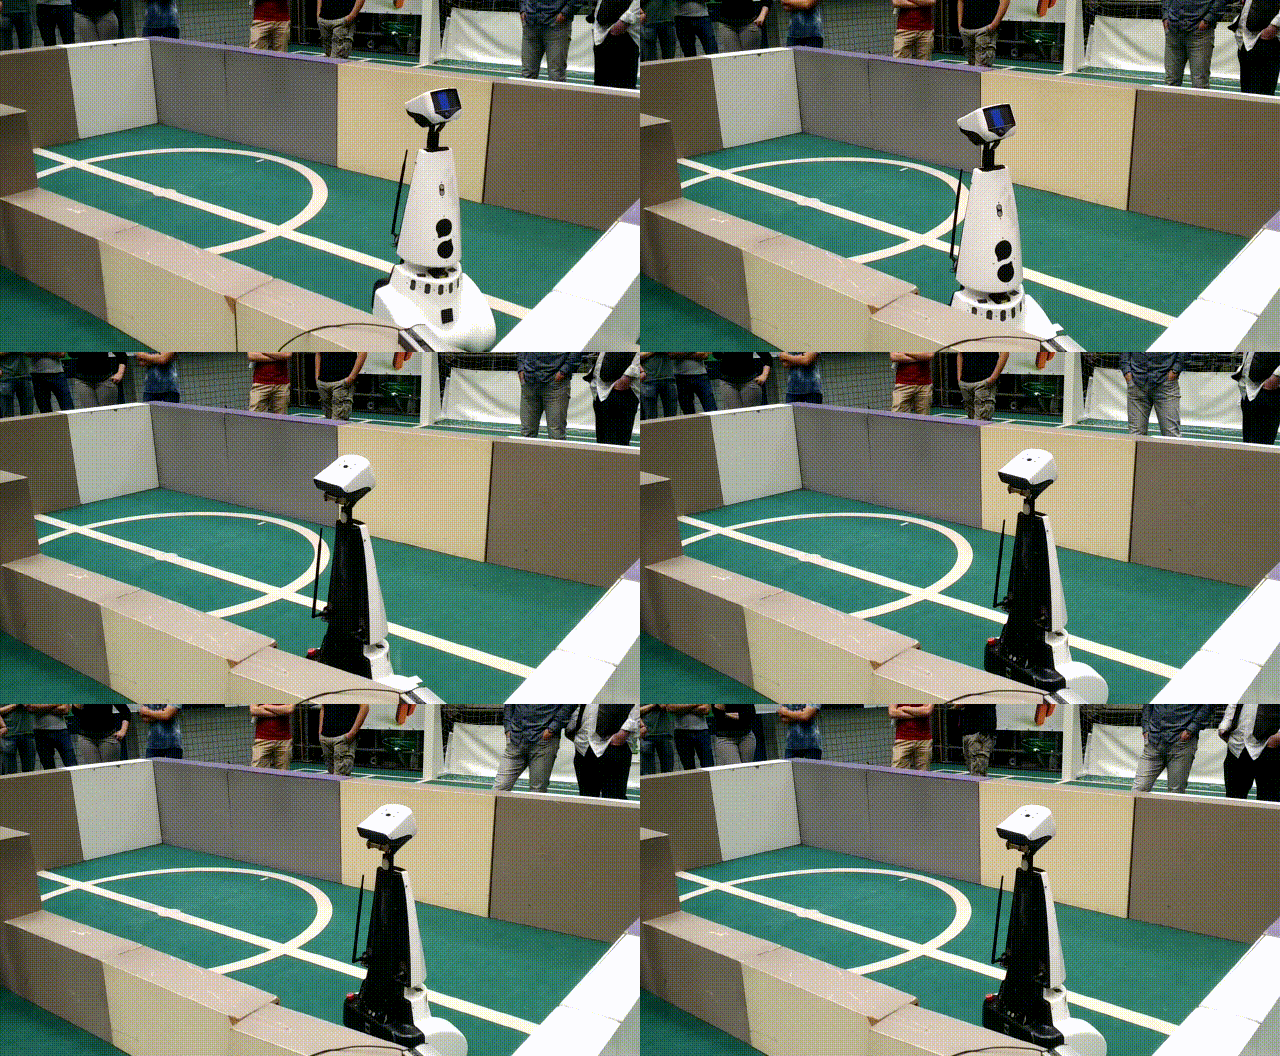
During the challenge, the second problem that was discussed above obstructed PICO from finding the exit. PICO failed to detect the wall at its right side and drove into it, which is shown in the animation below. unfortunately, this happened at both trials. After evaluation of the Escape room challenge, it was concluded that a different approach was required for the Hospital Challenge. This means that from this point on, the Wall follower algorithm is abandoned and a new a plan for a new approach is made.
Conclusion
A relatively simple algorithm was made for the Escape room challenge, which finds and then follows the wall at its right side until it detects the exit. Based on simulations, this algorithm was sufficient for completing the Escape room challenge. However, during testing, multiple differences were observed between the simulation and reality. It is learned that navigating using purely PICOs odometry is overall not a smart strategy, and therefore this strategy will no longer be used from this point. Hitting the wall due to a detection error was the reason the Escape room challenge ended premature for PICO, the exact cause of this error has not been found. This is however not an issue for the final challenge, because the next step is going back to the drawing table and come up with a new plan.
Hospital Challenge
The second and final challenge is the Hospital Challenge. In this challenge PICO has to find an unknown object in a hospital area which consists of a hallway and multiple rooms. After the Escape Room Challenge a new plan is made to successfully complete the Hospital Challenge. This plan consists of two phases: Mapping the hospital and Finding the object. During these phases PICO needs functions such as World mapping and object detection. Further, it needs to be able to move around without hitting a wall and plan a path towards a given setpoint. How Mapping and Finding the object are performed and how these functions are implemented is explained here.
[EXPLAIN WHAT MAKES YOUR SOLUTION UNIQUE; WHAT ARE YOu MOST PROUD OF?]
World mapping
In the first phase of the challenge, PICO has to make a map of the environment. To accomplish this, we make use of an external library called MRPT (Mobile Robot Programming Toolkit, https://www.mrpt.org/). This library contains some useful classes, that help us to efficiently program the software required for PICO to accomplish its task. The first task is to process the laser range data of PICO. We use a class the CObservation2DRangeScan, which takes as input a vector with range data, and a binary validity vector and the aperture of the range scan. The validity vector is used to consider which data points are valid to for example filter out the outer data points which contain a significant amount of noise. The Cobservation2DRangeScan object is inserted in a second class, the CSimplePointsMap. Each valid point is inserted into the map which contains the 2D coordinates of the points where the laser range finder detected a wall. The first set of data is used to create a points map for the world map. Now of course the world map needs to be updated with the new measurements. A second CSimplePointsMap object is created to store the current range data of PICO. We then use an iterative closest point algorithm (Levenberg-Marquardt), implemented in the CICP class to fit the points of the world map and current view together. From the displacement and rotation of the current view with respect to the world map, we obtain the location and alignment of PICO, with respect to its starting position. This way both PICO’s position and world map are continuously updated. The map can be output as a bitmap images and can be used to recognize the location of the rooms and doors.
Path planning
For the navigation of PICO we make use of the path planning algorithm implemented in the PlannerSimple2D class. This class only takes a gridmap in the form of a COccupancyGridMap2D object, thus we first convert the point map to a gridmap object. Each point from the world map is inserted in the COccupancyGridMap2d object, which based on input of the maximum x- and y-range determines which cells are occupied and which not. The gridmap is inserted in the PlannerSimple2D class which utilizes a wavefront propagation algorithm to find the shortest distance from the current location to the target set by the waypoint. The PlannerSimple2D object also contains the value for the radius of the robot, to make sure the found path does intersect with the walls. The path is output as a set of points with a given step size, which can then be used for navigation.
Phase 1: SLAM/mapping the hospital
[Jasper, how computes(pathplanner)/ which libraries etc./ think about copyright/gridmap/]
In phase 1, PICO will be building a map of the hospital by using the MRPT World Mapping and Path planner. Once this is done, PICO will return to its starting position and park there. Next to this, PICO has to use the map for defining rooms and doors. These features are further explained here.
Initialize map
[Aaron]
Building the map
The World Mapping algorithm and the Path planning algorithm are combined in order to map the hospital. The path planning algorithm is provided with a setpoint that is located outside the hospital. The setpoint is positioned sufficiently far away guaranteeing that it will be located outside the hospital. The Path planning algorithm will render a path to the setpoint and PICO will follow this path while scanning its environment and creating the map. While following the rendered path the hospital will be further explored and the path will be blocked by means of walls. At this point, the path planning algorithm will render a new path to the given setpoint taking the known map into account. This procedure, of following the path until the path is blocked and finding a new path, is repeated till the path planner cannot generate any path to the setpoint, e.g. the contour of the hospital is found. At this point, PICO will return to the starting position and will park backwards against the wall. In Video X a simulation of the mapping procedure is shown.
VIDEO MAPPING
Parking
[Aaron] Once the map of the hospital is finished PICO will start the parking phase. The path planner will generate the shortest path to the starting position based the world map. After arriving at the starting position PICO will rotate until it is aligned with the wall in front. The frontal distance to the wall is measured and PICO will rotate until it faces the wall backwards.
PICO will start driving backwards for the measured distance till it touches the wall. With the use of the control effort PICO will stop driving backwards, once it touches the wall.
VIDEO PARKING PHASE
NEED FOR CODE EXPLANATION?
Define rooms
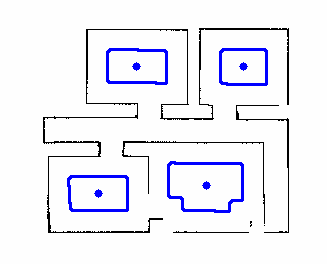
With the use of the worldmap rooms and doors are located. To locate the rooms first a set of image adjustments are performed on the worldmap, with the use of ‘opencv’ [opencv]. First the image is processed using erosion.[erosion] With the erosion process the walls in the image are thickend till the hallway and doors are all filled. This results in white spaces that represents a piece of the rooms, see Figure X. In the processed image the contours are found using the opencv function ‘findContours’ which is able to find contours in a binary image. [Suzuki][findcontours]. The function is set to construct a full hierarchy of nested contours, i.e. of the contours the children and parent contours are known. This is necessary since the largest contour is represents the entire hospital, the parent contour, and this is not of interest. For the contours of the rooms, the moments are calculated using Green’s formula [moments]:
[math]\displaystyle{ m_{ji}= \sum_{x,y}(array(x,y) \cdot x^j \cdot y^i) }[/math].
With the moments the center of the room [math]\displaystyle{ (\bar x,\bar y) }[/math] is calculated as:
[math]\displaystyle{ \bar x = \frac{m_{10}}{m_{00}},\qquad \bar y=\frac{m_{01}}{m_{00}} }[/math]
In Figure X a example is given for the contours and center points.
FIGURE EROSION
Locate Doors
Linda
After the world map is obtained, the inside of the hospital is marked by coloring the pixels. The walls and the surroundings of the hospital are marked with a different color. Using the opencv function 'cornerHarris' all corners of the hospital are detected. Subsequently, two types of corners are distinguished, namely corners that cover 90 degrees or 270 degrees of the inside of the hospital. Only the corners that are 270 degrees are used for further analysis. The set of corners that are 270 degrees are sorted in vertical and/or horizontal pairs only if they are 1.5 m apart or less and either the x-coordinate (vertical pair) or the y-coordinate (horizontal pair) is (approximately) the same. A few types of doors are considered: consisting of 4 or 2 corners of 270 degrees.
4 corner doors
To find doors that consist of 4 corners, the vertical pairs of two are sorted in quartets only if the y-coordinates of the two pairs are aligned such that together they could form a door. Subsequently, it is checked if the whole space in between the 4 corners of each quartet is marked as the inside of the hospital. If this is the case it is also checked if at least on the right or top of the so called door the pixels are marked as wall or surrounding. The latter is done to ensure that open spaces in between two doors that in front of each other are not detected as a door as well. If both requirements are fulfilled a 4 corner door is found.
2 corner doors
Two kind of 2 corner doors are distinguished.
Using the hint
When a door is located it is key that the pixels which are identified as the door opening are calculated. Combining this information with the center points of the rooms the hint can be used. The path planner is asked to plan a path to the center point of a room. When the path is know it can be checked through how many door openings the path goes to get to the room. When this is applied for all rooms it can be calculated for which room the most doors must be passed to get to it and the room in which the object should be is found.
Phase 2: Finding the object
With phase 1 completed, PICO now has access to room and door locations. Next to this, it knows the full layout of the hospital, which means that it can navigate anywhere in the hospital using the Path planning algorithm. The final piece of information that is used in order to find the object is the hint that is provided:
The object will be located in the room for which most openings (i.e., doors) have to be passed through to enter it.
Based on all of this information, a strategy is made in order to find the object as fast as possible. This means that, based on the hint and the locations of the doors and rooms, PICO should immediately identify in which room the object is located, and identify the object once it is this room. How this is realized, is explained here.
Tree structure
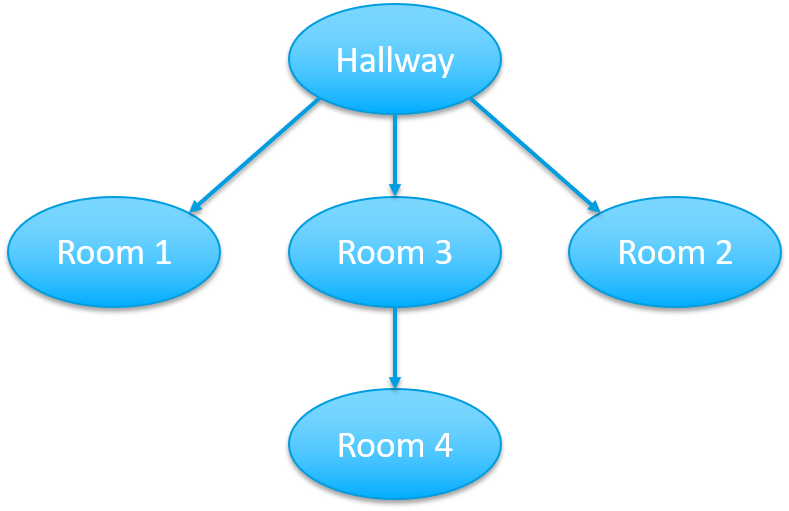
[Marleen] With the known locations of the rooms and doors a connection diagram can be drawn, see Figure X. In this diagram the connections between the rooms and the hallways are drawn. For example, if one is standing in the hallway and would want to visit room 2, it can either pass through room 1 or room 2.
Object detection
[Jasper] How defined/interpreted
The Challenge
[Marleen]
Conclusion
Part of code
code uitzoeken


