Embedded Motion Control 2013 Group 2: Difference between revisions
| Line 100: | Line 100: | ||
|- | |- | ||
==== Week 7: Oct 14 - Oct 20 ==== | ==== Week 7: Oct 14 - Oct 20 ==== | ||
{| | |||
|- | |- | ||
| || 5th Real robot test (Oct 17, 11.00 - 12:00 hrs) | | || 5th Real robot test (Oct 17, 11.00 - 12:00 hrs) | ||
|- | |- | ||
|} | |||
==== Week 8: Oct 21 - Oct 27 ==== | ==== Week 8: Oct 21 - Oct 27 ==== | ||
|- | |- | ||
Revision as of 15:04, 18 October 2013
Group Members
| Name: | Student id: | Email: |
| Joep Alleleijn | 0760626 | j.h.h.m.alleleijn@student.tue.nl |
| E. Romero Sahagun | 0827538 | e.romero.sahagun@student.tue.nl |
| L. Galindez Olascoaga | 0867854 | l.i.galindez.olascoaga@student.tue.nl |
| Koen Meeusen | 0657087 | k.a.meeusen@student.tue.nl |
| Ngo Hin Cheng | 0731296 | n.h.cheng@student.tue.nl |
Planning
Week 1: Sep 2 - Sep 8
| Week: | Activities: |
|---|
| Start ROS & C++ tutorials | |
| Prepare software (Ubuntu, ROS, Gazebo, etc..) | |
| Project planning & brainstorming |
Week 2: Sep 9 - Sep 15
| Conclude software troubleshoot. | |
| Start simulations in Gazebo for sensors and actuators identification. |
Week 3: Sep 16 - Sep 22
| Code development, module based. | |
| Code implementation for Corridor Competition, tests on simulation. | |
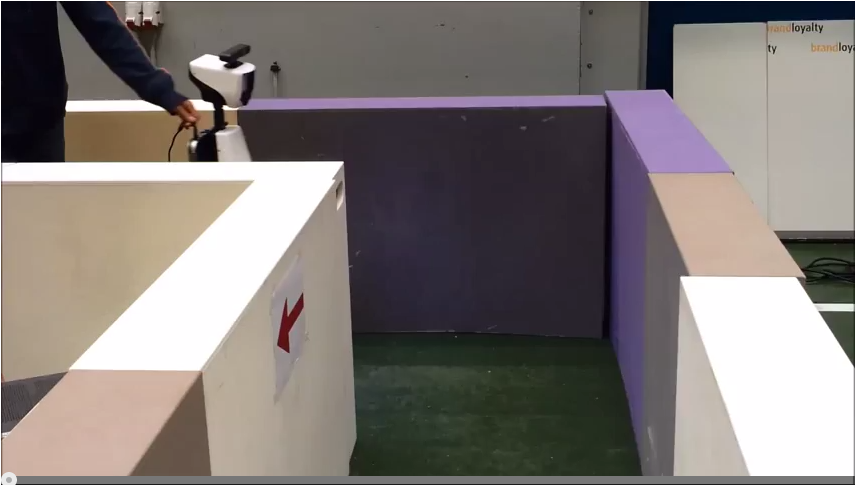
| First real robot trial (Sep 20, 13.00 - 14:00 hrs) |
Week 4: Sep 23 - Sep 29
| Last minute preparations for Corridor Competition | |
| Second real robot trial (to schedule..) | |
| Corridor Competition (Sep 25) | |
| 2nd Real robot test (Sep 26, 11.00 - 12:00 hrs) |
Week 5: Sep 30 - Oct 6
| 3rd Real robot test (Oct 3, 11.00 - 12:00 hrs) |
Week 6: Oct 7 - Oct 13
4th Real robot test (Oct 10, 11.00 - 12:00 hrs)
Week 7: Oct 14 - Oct 20
| 5th Real robot test (Oct 17, 11.00 - 12:00 hrs) |
Week 8: Oct 21 - Oct 27
Maze Competition (Oct 23)
Current Work
| Team Member: | Working on: |
| Joep Alleleijn | System architecture, message structure between nodes-> which information is communicated and how. Determine location within the environment based on laser data, build in functionality so it still works when there is an opening in the maze. |
| E. Romero Sahagun | Movement module/functions (move forward, backward, turn left/right) |
| L. Galindez Olascoaga | System architecture, interfaces and integration/path planning algorithm |
| Koen Meeusen | Wall and corner detection, area mapping. |
| Ngo Hin Cheng | Situation identification |
Progress
Week 1: September 2 - September 8
| Software installation |
| The goal of the first week was to install all necessary software. The installation of Ubuntu went well in general. In one case (on the 2013 TU/e laptop) Ubuntu would install correctly (it said) but when Ubuntu was started the desktop screen of Ubuntu was not loaded. Instead a command prompt like screen was displayed and reports where shown that there were missing files. The problem was eventually solved as follows:
In case the laptop has been fitted with a small ssd parallel to the main harddisk (like the 2013 TU/e laptop), Ubuntu will not install properly. Because the ssd-drive and the harddisk are placed parallel the laptop will start faster since the ssd provides a fast start-up. When Ubuntu starts it requires files which are not present on the ssd, which causes Ubuntu to fail. The solution is to disable the raid configuration of the laptop. This disables the ssd-drive and its advantages but Ubuntu will start now since all the required files are received from the harddisk. In some cases the Raid is called Intel RST (rapid storage technology). Switching of the raid system in BIOS might result in losing your windows and all your data on the disk. So it is not recommended ( We have never tried it before). Login in windows and open the Intel Rapid Storage Technology program and disable raid support in a less brutal way to avoid such risks. The other required software installed well except Qt. By a few persons Qt did not install. Therefore the choise has been made to use eclipse to type the c++ code. The disadvantage is that in eclipse you will have to rebuild your “cmake” and project files every time you change something in the script. This requires a restart of eclipse. Qt does not have this problem. An advantage of eclipse over Qt is that eclipse can handle vector programming easier then Qt. |
| Problem investigation |
| In order to solve the maze problem some important questions had to be answered, namely:
- Is the maze unique? (In other words, is there only one solution?) - Are there island in the maze? (walls which are not connected to the outside of the maze) The answered to these questions are yes, the maze is unique and no, there are no island. With these questions answered a simple strategy has been made to solve the maze: If the maze contains islands the solution won’t be totally unique, because there are multiple ways to solve the maze. With islands it is even possible to get stuck in a loop around the island in the maze. With only one path which is correct (a unique solution) and no islands a solution to the maze can be to follow the right hand wall of the robot. In case of the corridor challenge, the solution is not unique, since there are to exits (a correct one and a false one). Although the strategy to follow the right hand wall will in this case give the correct solution. Besides more advances technique to solve a maze, this solution can easily be programed and can be used for testing the simulator. The goal is to have a more advanced maze solving algorithm for the corridor test. However this has to be developed yet. |
Week 2: September 9 - September 15
| Testing laser data acquisition | ||||||||||||||||||||||||||||||||||||||
| Simulated laser data (Laura and Joep) | ||||||||||||||||||||||||||||||||||||||
Structure message from laser:
|
| Structure message for Velocity: |
| ~$ rostopic type /pico/cmd_vel
geometry_msgs/Twist ~$ rosmsg show geometry_msgs/Twist geometry_msgs/Vector3 linear float64 x float64 y float64 z geometry_msgs/Vector3 angular float64 x float64 y float64 z |
To be refered using the following C++ lines of code:
geometry_msgs::Twist cmd_msg; cmd_msg.linear.x = 0; cmd_msg.angular.z = 0; cmd_msg.linear.y = 0; cmd_msg.linear.z = 0; cmd_msg.angular.x = 0; cmd_msg.angular.y = 0; cmd_pub.publish(cmd_msg); |
Week 3: September 16 - September 22
| Testing 3D simulation and visualization |
| The goal for the third week was to ensure the complete functionality of the working environment. After applying the changes included in the updated wiki the complete functionality of Gazebo was achieved. The maze was succesfully spawned and the urdf file of the robot was displayed correctly. |
 |
| The visualization of the robot in rviz was also achieved in all computers and the laser data was as well displayed. The topic to which we have to subscribe in order to visualize this data is /pico/laser which is of type [sensor_msgs/LaserScan]. The contents of this message are shown in last week's post. |
 |
| We could also identify that reference frame transformation data as well as odometry data are already provided in the general repository. The following screenshot shows the reference frame transformation tree of our system. If we wanted to have a fixed reference frame we would have to add it before the odometry one. |
 |
| Defining our system's architecture |
| During this week we also decided on our system's architecure which we defined as a modular one. This enables us to work simultaneously in several algorithms, delegate work and also use ROS's functionality and communication infrastructure. We decided to create our own .msg files and headers in order to structure data comprenhensively. The following image shows a print screen of our architecture as displayed by rxgraph. We programed nodes for each package that subscribed to and published the topics we will later use. In this way, we only have to edit the nodes' source code and add the algorithms for each module. We have already uploaded this set of packages to our svn repository. We choose to divide the the main functionality of the robot within the ros-environment into different modules that are coupled sequentially. The system is divided into 5 main nodes: sensors, location, map, trajectory planner and robot movement. The nodes will use a structure to communicate. The main name of this "Data", each node will add sub cell into the structure beginning with the name of the node, followed by the variable that is added. Example: "Data.location.theta_wall". Furthermore, we will use SI units. |
 |
| We can see in this graph that we have, up to now, a communication structure with 8 nodes: |
| /rosout: corresponds to ROS master |
| /rviz, /pico_state_publisher and /GazeboRosLaser_node: were provided in general repository and contain the simulation and visualization functionality as well as the robot's sensor reading and tf algorithm. |
| /path_prediction,/map and /localization nodes will be written by us and will contain the needed algorithms for the challenges. |
| Movement of the robot |
| A movement function has been programmed in order to work with Pico's linear and angular displacement. For Pico to drive within the middle of the corridor, a second function takes care on fixing the direction of the robot. This fixing procedure is activated once the robot detects an obstacle closer than 30cm or when it detects the robot orientation, with respect to the middle line, changes more than 20 degrees. These functions have been implemented successfully with the rest of the code for the corridor competition in the simulation. In simulation the robot is able to go forward in the corridor without hitting any walls. |
| Test plan for September 20 |
| 1. Follow wiki's instruction on using Pico to set it up. |
| 2. Be able to read and interpret sensor data (laser and odometry) |
| 3. If any of the algorithms (mapping, wall detection, localization, trajectory planning...) have already been tested in simulation we could try implementing them. |
Week 4: September 23 - September 29
| Localization Algorithm | |
| The localization algorithm is based on the sketch you can find in the pdf-file. In a closed corridor it uses 4 points and the corresponding angles to calculate the orientation of the robot compared to the center line of the corridor and the x-position compared to the center line (e.a. the line perpendicular to the center line of the corridor). Two points are the points perpendicular to the center line of the robot and 2 points are the points perpendicular to the walls. | |
| The algorithm takes into account 4 different situations. The first situation is when the robot is in a closed corridor, in this situation all the desired points are available. The second situation is when the robot has an opening on the left/right, in this situation the corner on which side the opening is is used to calculate what the width of the corridor is. The third situation is when the robot has turned to change to different corridor (bottom situation in the pdf). In this situation the information of the two closest corners is used to calculate the width of the next corridor is, where the center line is located and what the orientation and x-position of the robot is compared to this center line. The output of the algorithm is in angle "Theta_robot", which is the angle between the center line of the robot and the x-position, which is the distance to the center line of the corridor. Values larger than zero means that the robot is on the right of the center line, values smaller than zero means that the robot is on the left of the center line. | |
| File:Localization.pdf | |
| Corner Detection Algorithm | |
| For the mapping of the environment a function has been created in order to detect the edges of the maze. Before the detection algorithm was build the following requirement to the algorithm were made:
The corner detection function should: • Detect corners / edges. • Detect corner types. • Store locations and types. |
|
| The different corner types are divided into a number of types. In order to identify the type of each corner the following type-names have been given to the numbers by using an enumerate.
1. Left_outside 2. Left_inside 3. Right_inside 4. Right_outside 5. Blind_left 6. Blind_right 7. Leftback_inside 8. Leftback_outside 9. Rightback_inside 10. Rightback_outside |
|
| For each type of corner can be specified by using the measuring data. The localization provides the angle of the robot in relation the corridor. So first all the laser data of the robot are converted into x and y coordinates in relation to the robot. With the angle of the robot in relation to the corridor the measured x and y position are translated into the coordinate system parallel to the corridor. The new y direction lies parallel to the heart line of the corridor and the new x direction lies perpendicular to the heart line of the corridor. These new coordinates are called the normalized coordinates. With these normalized coordinates the position of the edge are calculated. The positions of the edges are later on translated back to the robot coordinate system.
With the normalized coordinates the direction of the wall is determined. A wall can go vertical or horizontal within certain margins / deviations. For the detection of the different types of edges the difference is made between vertical_up, vertical_down, Horizontal_left and Horizontal_right. When the normalized y-coordinate becomes larger than the defined margin the direction vertical_up is detected, when the normalized y-coordinate becomes smaller the direction vertical_down is detected. (These names are chosen due to the top-view of the situation.) The algorithm to determine the corners will use these directions. When the measured direction changes, there must have been an edge (assuming no errors). Since there are errors in the environment (by example: gaps between walls) and the measurements, certain margins are applied to avoid that due to the errors edges are detected. The algorithm checks whether the previous point lies within a certain margin of the current point. The check considers the normalized x and y direction of the point. If by example the current direction is horizontal the normalized y values should be constant (within the margin). If the change in normalized y values changes to much (more than the margin) the direction is changed. By checking the normalized x value the new direction can be determined (vertical_up or vertical_down). This results in a corner type (one or three) and a corner location (in normalized coordinates). In case of the corner types 5 and 6, the blind corners, new values of both x and y are outside the margin. This means that blind corner has been found. |
|
| As can be seen in the figure, a clear jump in measured coordinates can be detected. The new direction is now unknown, since the direction of the wall detected behind the blind edge is yet unknown. The next normalized coordinate will show whether the newly detected wall is vertical or horizontal and set the new direction. When a jump in measurement data is detected, depending whether the coordinates have become closed or further to the robot determines the different between type 5 and 6. | |
| Corridor competition | |
| During this week we derived a simplified algorithm for the resolution of the corridor competition. We programed it in a state machine style in order to make its execution sequential. |
Week 5: September 30 - October 6
| Data-Filtering | ||
| Shortly after the corridor competition the PICO robot was rebuild. We were the first group to test with the rebuild robot. During the testing the following observation has been done:
Due to the removal of a control layer inside the robot, the laser data can now contain zero-values. These zeros correspond to measurements which have deflected and not returned to the laser. In the old robot control corrections were made to avoid zero-values. In order to prevent the robot to fail on the zero-values an algorithm has been made which removes the zero-values and also evens out fluctuations in the measurement data. With the newly build vector (without zeroes) the other algorithm can determine the next step of the robot. |
||
| Testing laser data reading errors | ||
| After running a testing routine for the laser data being read we found out the following: | ||
| Observations: | ||
| 1. The size of the array is not always 1081. | ||
| 2. The amount of packets (arrays) that are corrupted is not as high (41 wrong out of 7500).This changed during other experiments when we saw that the wrong data increases as you get closer to the walls. | ||
| 3. We think that the first 5 iterations give wrong laser data. | ||
| 4. There is a significant variance in the distances from the robot to the walls (not sure if the problem is from our algorithm or from the data given by the laser driver). | ||
| 5.Variance | ||
| Routines to program for robustness | ||
| 1. Consider the size of the array as a variable (use sizeof() instead of a constant of 1081) | ||
| 2. Consider not using the data given by the first 5 iterations of laser data acquisition. | ||
| 3. Filter data twice: the first time throw away the first and last 10° of the laser data, then identify garbage values and normalize the overall data (using for example a Gaussian distribution->Koen's algorithm). | ||
| 4.Program regularly used routines into functions (for instance get minimum value of an array). | ||
| 5. Consider the redistribution of our architecture, we could have a decision making node for example coordinating the processes with a hierarchical peer-to-peer structural model or orchestra. | ||
| 6.Modify the algorithm to keep the robot in the middle or the corridor. So far we have been implementing routines based on trigonometry, however, since the data of the laser is not so reliable, we now think we should program a proportional controller. | ||
| 7.Modify the turning function. | ||
| SUMMARY: | ||
| 1. We need to have reliable data for our algorithms to work correctly ->filtering of laser data function. | ||
| 2. The focus is in the turning and going forward functions, if they work well we can implement a very simple algorithm to solve the maze ->turning and going forward (centered) functions. | ||
| 3. According to the algorithms we are going to use we should redistribute our architecture as convenient. | ||
| Situation identification | ||
| The action of the robot depends on the surroundings of the robot, therefore it is necessary to identify the situation. Basically, there are eight main situations, these are shown in the figure below. If the robot does not detect any corner points, then it is located in a corridor. In this case the robot can go straight on. On the other hand, if the robot detects any corner points, then it might need to turn. Whether it needs to turn, depends on the situation. | ||
 | ||
| Corner points determine the situation, hence corner points are inputs for the situation identification process. The input consist of the x- and y-position of the corner points, corner points ID and the type of the corner points as mentioned in Corner Detection Algorithm. Given this input, all situations in the figure can be identified and the algorithm will give the situation represented by numbers in the following way: 0. unknown
1. right_turn 2. left_turn 3. corridor 4. straight_right 5. straight_left 6. t_junction 7. intersection 8. dead_end 9. maze_end |
||
| The order of incoming corner points could not be determined in advance, e.g. for situation (c) the left corner point or the right corner point could both be the first incoming corner point. Besides the situation identification, the algorithm will give two ordered corner points as output. These two points determine the direction that the robot will take; the order of these two corner points is determined counter clockwise, starting from the viewpoint of the robot. In this way, the robot will turn right if it has multiple options. If it is not possible to turn right, then the robot will go straight on and turn left is the last option in cases with multiple options. When the robot gets into a dead end, the robot will turn 180 degrees counter clock wise. |
Week 6: October 7 - October 13
The decision algorithm gets input from the situation identification algorithm. The input for this algorithm are two corners in the situation with the corresponding information to the corners and the type of situation. The angle of the robot compared to the center line of the corridor and the lateral position of the robot compared to the centre line of the corridor.| New Ros-structure |
|
In the old ros structure almost all the main components like the mapping and localization were placed in separate nodes. During programming of the different algorithms we have come to the conclusion that almost all these processes work sequential. For the mapping of the area the localization is required (for our algorithms). The advantage of using different nodes is that the nodes will run parallel to each other. In case of sequential algorithms, running parallel is not wanted since some of the nodes might not have had the correct data yet.So a new structure is proposed, which will consist of a smaller number of nodes. In each node now runs a sequential process which can consists of multiple algorithms. The different nodes which are left should run parallel. Together with a controller and the parallel processes control layers can be build, with the advantage that a higher control layer can overrule a lower control layer. |
| Decision making |
| The are 8 different situations possible as mentioned in “Situation Identification”, based on these situation there is some desired driving behavior, turning right is preferred over going straight, straight is preferred over going left and in at a dead end the robot has to turn 180 degrees counter clockwise. This leads to 4 basic driving modes, drive straight, turn right, turn left, turn 180 degrees counter clockwise. Depending on the situation the robot is in, the robot has to follow a certain procedure to for example take a right turn. |
|
The algorithm uses the coordinates of the two corners to calculate what the center of the corridor is which the robot has to turn in. Than the robot drives to the intersection of the two center lines of the current corridor and the new corridor, makes a 90 degrees clockwise turn and drives straight again. When these tasks are performed the algorithm reset the output to zero and new information can be fed into the algorithm. When a situation is identified and the robot is in it’s driving mode, the robot stays in these driving modes until the end of the cycle is reached. Each mode is a state in the process/tasks the robot has to perform to drive thru the corner. |
 |
 |
 |
Week 7: October 14 - October 21
Doubts & Questions
| Week: | Doubts: |
|---|---|
| Sep 2 - Sep 8 | |
| Issues related with software installation | |
| Sep 9 - Sep 15 | |
| Issues related with software installation | |
| More details about the project | |
| Sep 16 - Sep 22 | |
| What is the sample frequency and scan methodology of the system/laser? - we have to figure that out. | |
| Orientation coordinate system - we can define that. | |
| Frequency the robot - we have to figure this out | |
| Obstacles in the hall competition/maze? - no, just the walls. | |
| Is it possible to get more days available every week to work on the robot? no, we should make a test plan, limited time is part of the challenge. | |
| Is it possible to test again on the real robot early next week? no | |
| Is there a time limit to complete the maze? No | |
| How reliable is the simulation? If we manage to communicate properly with the robot on Friday, and we test our solution later on the simulation, can we trust it?? We have to run tests both in simulation and in the actual robot in order to define how reliable the first one is. | |
| Are we allowed to use motion planning algorithms available in ROS repositories? Yes, but we should be able to generate our own solutions to the problem, it is not advisable. | |
| Sep 23 - Sep 29 | |
| ... | |
| Sep 30 - Oct 6 | |
| ... | |
| Oct 7 - Oct 13 | |
| ... | |
| Oct 14 - Oct 20 | |
| ... | |
| Oct 21 - Oct 27 | |
| ... |