Mobile Robot Control 2020
'PICO in the Hospital'

Introduction
This course is about software design and how to apply this in the context of autonomous robots. The accompanying assignment is about applying this knowledge to a real-life robotics task.
Course Schedule and Lecture Slides
Lectures will be given on Wednesdays from 15.30h-17.30h in an online fashion. The course schedule is as follows:
| April 22 | Introduction by René van de Molengraft, Tech United , VanderLande and Lely | Tooling, Infrastructure and Assignment by Bob Hendrikx |
| April 29 | Tutorial Lecture #1 - Part 1-2 - Part 3 | |
| May 6 | Tutorial Lecture #2 - Part 1 - Part 2 - Part 3 | |
| May 13 | Escape Room Competition | |
| May 20 | No Lecture | |
| May 27 | Coordination: mechanisms and architectural patterns by Herman Bruyninckx | |
| June 3 | Presentation of final design by the groups. | |
| June 10 | Final Competition | |
| June 17 | No Lecture | |
| June 24 | Deadline: Wiki Pages | |
Presentation Schedule
As you have seen in the course schedule, the presentations of the final software design will take place on June 3rd. As we did last years, each presentation will take no more than 6 minutes, followed by a 4 minute discussion. Given this years circumstances, we have decided to do these presentations for each group separately. However, your entire group is required to be available for the discussion session. Therefore, we plan these presentations during the regular lecture hours of the course. For the presentations of your final software design, please take the following into account:
- Pick a time slot in the table below. First come, first served.
- Send an invitation to all your group members, as well as René van de Molengraft, Jordy Senden, Bob Hendrikx and Wouter Houtman. These mail addresses can be found at the bottom of this page. Make sure, your invitation is accompanied with a meeting room of Microsoft Teams.
- As long as your presentation can be shared via the Teams meeting, you are free to chose the medium you like.
- In order to not waste time, make sure all team members are present, and both microphones and cameras are tested BEFORE the start of the presentation. Make sure your microphone is muted when you are not speaking.
| Date | Time | Group |
|---|---|---|
| 3-6-2020 | 15:30 - 15:40 | group 3 |
| 15:45 - 15:55 | group 1 | |
| 16:00 - 16:10 | group 7 | |
| 16:15 - 16:25 | group 6 | |
| 16:30 - 16:40 | group 2 | |
| 16:45 - 16:55 | group 8 | |
| 17:00 - 17:10 | group 4 | |
| 17:15 - 17:25 | group 10 |
Getting Started
To get started, please do the tutorials on the Tutorial Page.
Design Document
Hand-in a 3-page A4-sized design document as pdf (<1Mb) that pictures/describes the initial design idea with:
- Requirements,
- Functions,
- Components,
- Specifications
- Interfaces.
You should upload this design document to your group's Wiki-page as this is a vital document in the design process. Make sure the document has been uploaded on May 4th, 17.00h. In case of questions about the document, consult your tutor.
Escape Room Competition

Challenge Specifications
- You have finished the assignment if PICO did not bump into walls and the entire rear wheel is across the finish line.
- Do not touch the walls! Slightly touching is allowed, however, bumping (i.e., driving head-on into a wall) is not allowed! If PICO hits the wall, we decide whether it counts as bumping.
- Every team has two trials (= max one restart). A trial ends if:
- PICO bumps into the wall
- PICO has not moved or has not made sensible movements (as judged by the tutors) for 30 seconds
- The total time limit of 5 minutes per group is reached
- The group requests a restart (on the first trial)
- restart means:
- PICO restarts at the defined start position
- The trail time (= the time graded) is reset, but
- the total time keeps running
- Maximum speed (is limited in PICO): 0.5 m/s translational, 1.2 rad/s rotational.
- There will be no second attempt if first attempt was successful
On the right you can find one example of a Escape Room Challenge.
Environment Specifications
- The shape of the room is rectangular, the dimensions will not be given before the start of the challenge.
- PICO starts at a random position in the room (but equal for all groups), PICO does not necessarily face the exit, nor a straight wall.
- The orientation of the corridor will be perpendiculair to the wall.
- The wall (on the far end) of the corridor will be open
- The walls might not be perfectly straight, the corners might not be perfectly perpendicular, the walls of the corridor might not be perfectly parallel. The width of the corridor will be reasonable (somewhere between 0.5 and 1.5 meters).
- At the exit, the finish line is located more than 3 m into the corridor. The walls that can be used to align PICO will be a little bit longer.
Robot Software
- Make sure your software is easy to set-up, i.e:
- Your software can be updated with one easy command, e.g. 'git pull'
- Your software can be compiled using 'cmake' and 'make'
- To start your software, only one executable has to be called
- If your set-up deviates from this method, let your tutor know 1 week before the challenge!
- The software of all groups will be updated on the robot before the challenge starts
- This way, teams starting the challenge have as much time as teams that do the challenge at the end
Hospital Competition

Challenge Description
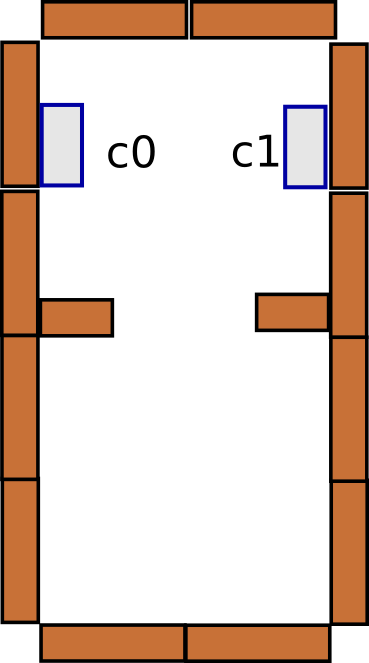
The figure on the right shows a 2D representation of a possible Hospital setup, as an example. The map shows several rooms and a hallway. In each room there are cabinets (represented by a rectangular block). The objective is for PICO to "deliver" medicines from one cabinet to another (the order of which defined by the judges just before the challenge starts). The hospital will contain a number of unknown static and dynamic objects (boxes, human actors walking)
Since PICO does not have the capability to grab and carry medicines, the "delivery" task cannot be performed physically. Instead, the "delivery" is defined by the following steps:
- Drive up to the first cabinet.
- Position in front of the cabinet, facing towards the cabinet.
- Give a clear sound signal, signalling PICO has arrived at cabinet A (io.speak("I arrived at cabinet four")).
- Drive to the next cabinet.
- Position in front of the cabinet, facing towards the cabinet.
- Repeat until all the cabinets are visited in the correct order
Setup Specifications
- The hallway will be approximately 1.5 meters wide and does not have to be straight.
- All walls in the hospital will be approximately straight. The walls will be made of the 20cm thick blocks that are frequently used during test sessions.
- All corners in the hospital will be approximately right.
- The doors inside the hospital will be (time-invariant) openings in the walls of about 0.5-1m that may be closed or open.
- It is possible that a room has more than one door.
- A cabinet is represented by a rectangular block.
- The front of the cabinet is defined as the first linesegment in the line array that represents a cabinet.
- A region will be marked in front of the cabinets. This is the region in which PICO must stand (definition: middle-point of PICO in rectangle) when "taking" or "delivering" the medicine. This region will be a square with sides equal to the length of the front of the cabinet.
- A random amount of dynamic objects will be present in the form of human actors. Additionally, an random amount of rectangular static objects will be placed throughout the hospital (see green blocks in figure on the right). The position does not have to be parallel to the walls.
- UPDATE2020! Since this year the challenge will be held completely in a simulated environment, the role of dynamic objects will not be performed by human actors. Instead, there will be objects in the hospital that are moving around in the hospital. These objects will try to not bump into PICO on purpose. The velocity of these object will be in the range of normal human walking velocity.
Challenge Conditions
- PICO will start in the start area, defined by a rectangle of approximately 1 by 1 meters. The orientation of PICO is arbitrary (i.e., not known to your software).
- The list of cabinets to be visited will be provided right before the challenge starts as a list of integers (0 identifies the first cabinet in the array).
- After starting the software, PICO has to drive to the first cabinet to "pick up" the medicine.
- If PICO found the correct cabinet and signalled his "arrival", he has to drive to the next cabinets to "drop off" the medicines.
- The task is completed after PICO visited all cabinets on the list.
- Bonus points are given to the groups that can detect the static and dynamic objects and present them in the world model. How this is presented is left to the groups.
- Within the hospital start area, we will make sure that some visible features (i.e. lines, corners) remain visible (but we will not make it easy).
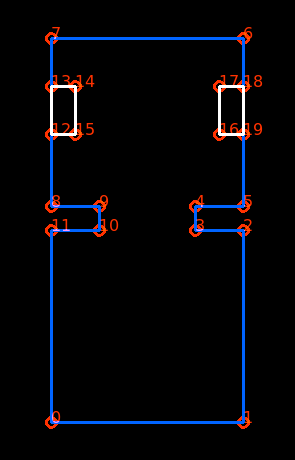
- An actual map of the hospital will be provided to the teams one week before the final challenge, this will encompass a vector map (an example is provided at the bottom of this section). Note: we will only provide the vector map for the final challenge: no simulator map, no .png-image (as presented here on the right).
Challenge Rules
- The list of cabinets to visit has to be supplied to the executable when starting the challenge, in the following format (for cabinets in the order: 2 -> 4 -> 3,):
./pico_do_your_thing 2 4 3
- Do not touch the walls or objects! Slightly touching is allowed, however, bumping (i.e., driving head-on into a wall) is not allowed! If PICO hits the wall, we decide whether it counts as bumping.
- Every team has two trials (= max one restart). A trial ends if:
- PICO bumps into: the wall, a static or a dynamic object.
- PICO has not moved or has not made sensible movements (as judged by the tutors) for 30 seconds
- The total time limit of 10 minutes per group is reached
- The group requests a restart (on the first trial)
- restart means:
- PICO restarts at the defined start position
- The trail time (= the time graded) is reset, but
- the total time keeps running
- Maximum speed (is limited in PICO): 0.5 m/s translational, 1.2 rad/s rotational.
- There will be no second attempt if first attempt was successful
- Every situation that might occur, that is not covered in this document will be evaluated on the spot. If this happens, the judges have the final word.
Visualization
- Your code should save a snapshot of the laserdata in your group folder when in front of each cabinet (e.g., using OpenCV).
Robot Software
- Make sure your software is easy to set-up, i.e:
- Your software can be updated with one easy command, e.g. 'git pull'
- Your software can be compiled using 'cmake' and 'make'
- It is allowed to use multiple executables.
- If your set-up deviates from this method, let your tutor know 1 week before the challenge!
- The software of all groups will be updated on the robot before the challenge starts
- This way, teams starting the challenge have as much time as teams that do the challenge at the end, compiling in between trials is not allowed.
- If you use a separate catkin workspace
- Make sure this workspace is compiled during the final testing hour
- Building separate catkin workspaces during the final challenge is not allowed
- The safest way to make sure your code works is by avoiding catking workspaces and including everything in your CMakeLists.txt
Example map format and code
- We provide a simple example of a room with two cabinets and the code to read the map into your own c++ code.
- For this simple example, a simulator map is also provided. (Note: a simulator map will not be provided for the final challenge).
- We used the 20cm thickness blocks for your convenience
- Remember to add unknown objects to your simulator and test environments and/or create other challenging maps and test scenarios!
You can find an example map (JSON) and the code to get you started here: File:Mrc map format 2021.zip
Overview of example map.
Visualisation of vector map.
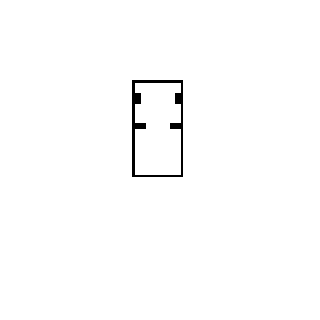
Bitmap representation of map, used for simulator (see zip file).


Map For The Final Challenge
- The simulation environment for the Hospital Challenge, with static and dynamics objects, can be found here.
- The JSON file for the map for the final challenge can be found here: FINALMAP.zip (version where gridmap cabinets are corrected)
- You are free to annotate / change this map to suit your software design
- The start area is shown in the image below
- A simulator gridmap of the environment is also provided
- Clutter will be added (both static and moving) on the day of the challenge, adhering to the rules specified under "Hospital Competition"
- Run `mrc-update` to get a sliding visualization and a safety stopping radius making the moving objects stop
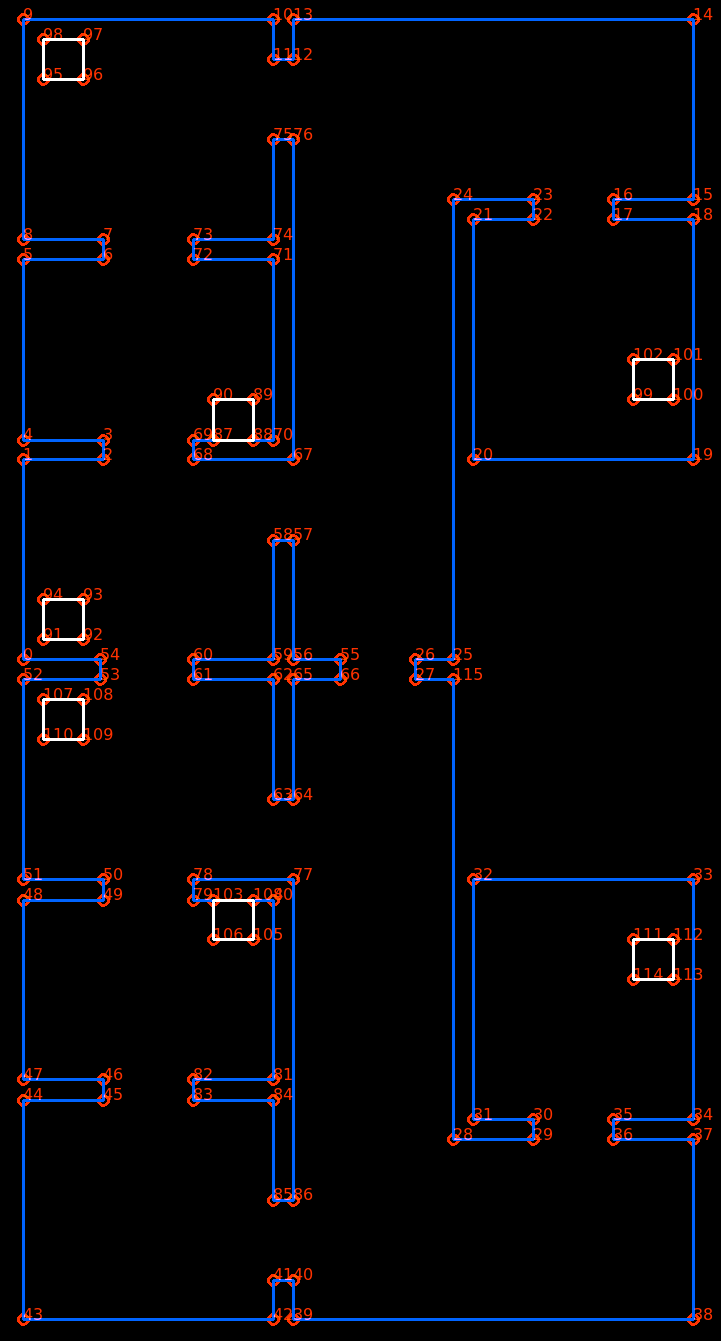
Final map as provided
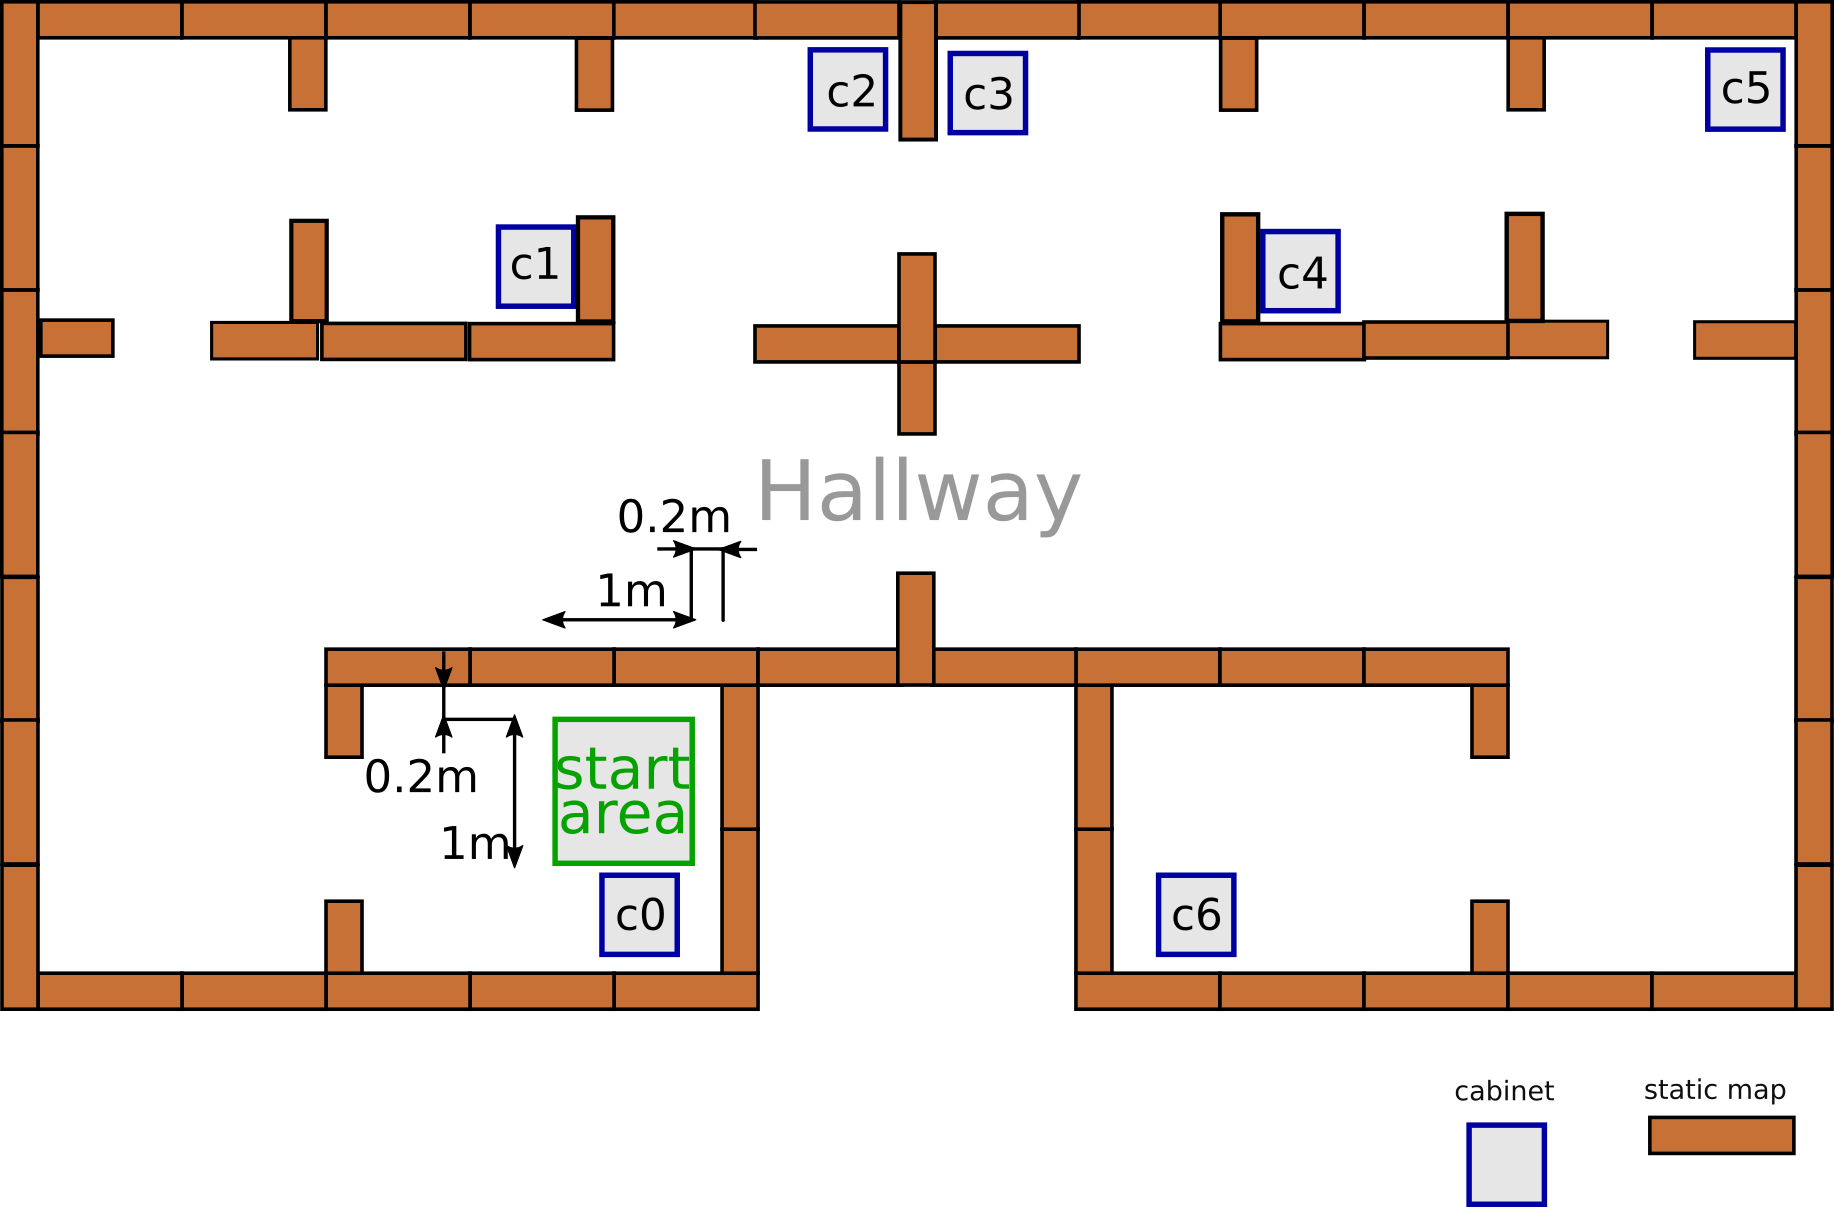
Start area (1m x 1m)


Group Wiki Pages
Group 1 - visit wiki - Tutor: Wouter Houtman
Group 2 - visit wiki - Tutor: Bob Hendrikx
Group 3 - visit wiki - Tutor: Hao Liang Chen
Group 4 - visit wiki - Tutor: Marzieh Dolatabadi Farahani
Group 6 - visit wiki - Tutor: Wouter Kuijpers
Group 7 - visit wiki - Tutor: Elena Torta
Group 8 - visit wiki - Tutor: Jordy Senden
Group 10 - visit wiki - Tutor: Hao-Liang Chen
Contact Details
Tutors
Bob Hendrikx - r dot w dot m dot hendrikx at tue dot nl
Hao Liang Chen - h dot l dot chen at tue dot nl
Jordy Senden - j dot p dot f dot senden at tue dot nl
Peter Dooren - p dot v dot dooren at tue dot nl
Manuel Muñoz Sánchez - m dot munoz dot sanchez at tue dot nl
César López - C dot A dot Lopez dot Martinez at tue dot nl