Embedded Motion Control 2014 Group 11
Go back to the main page.
Group Members
| Name: | Student id: | Email: |
| Groupmembers (email all) | ||
| Martijn Goorden | 0739273 | m.a.goorden@student.tue.nl |
| Tim Hazelaar | 0747409 | t.a.hazelaar@student.tue.nl |
| Stefan Heijmans | 0738205 | s.h.j.heijmans@student.tue.nl |
| Laurens Martens | 0749215 | l.p.martens@student.tue.nl |
| Robin de Rozario | 0746242 | r.d.rozario@student.tue.nl |
| Yuri Steinbuch | 0752627 | y.f.steinbuch@student.tue.nl |
| Tutor | ||
| Ramon Wijnands | n/a | r.w.j.wijnands@tue.nl |
Time survey
The time survey of this group will be hosted on a Google drive. Therefore, all group members can easily add information and anyone can see the up-to-date information. The document can be accesed by clicking this link: time survey group 11
Planning
Week 1 (28/4 - 4/5)
Finish the tutorials, including
- installing Ubuntu,
- installing ROS
- installing SVN
- get known with C++
- get known with ROS
Week 2 (5/5 - 11/5)
Finish the tutorials (before 8/5)
- Setting up an IDE
- Setting up the PICO simulator
Comment on Gazebo Tutorial
When initializing Gazebo, one should run the gzserver comment, however, this can result in a malfunctioning program, i.e. you will get the following message: Segmentation fault (core dumped). The solution for this is to run Gazebo in debugging mode (gdb):
- Open a terminal (ctrl-alt-t)
- Run:
gdb /usr/bin/gzserver
when (gbd) is shown, type run and <enter> - Open another terminal (ctrl-alt-t)
- Run:
gdb /usr/bin/gzclient
when (gbd) is shown, type run and <enter>
Comment on running Rviz
Simular to the Gazebo tutorial, the command rosrun pico_visualization rviz can also result in an error: Segmentation fault (core dumped). Hereto, the solution is to run Rviz in debugging mode:
- Open a terminal (ctrl-alt-t)
- Run:
gdb /opt/ros/groovy/lib/rviz/rviz
when (gbd) is shown, type run and <enter>
Moreover, in order for the camera to work properly, in the Displays view on the left change the Fixed Frame.
Corridor detection
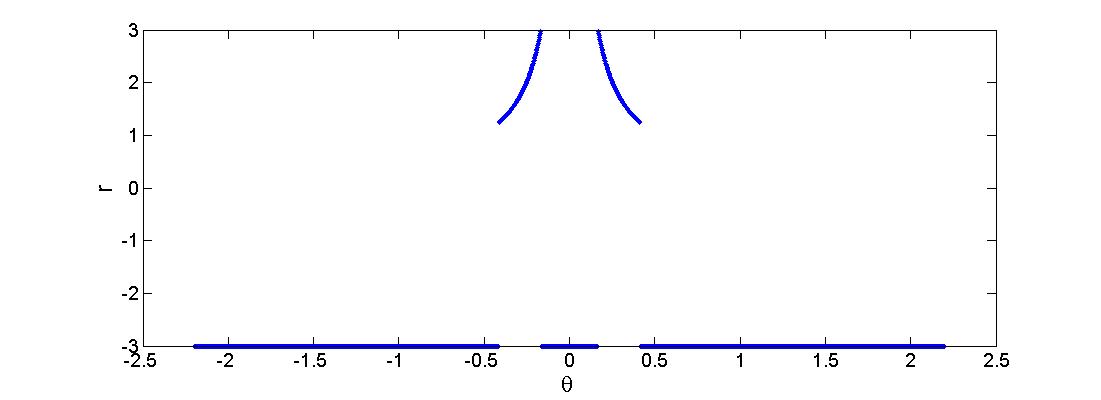
First a horizon R is being set. Every value r(i) > R is being replaced by r(i) = -R. This can be seen in the figure below where R=3.
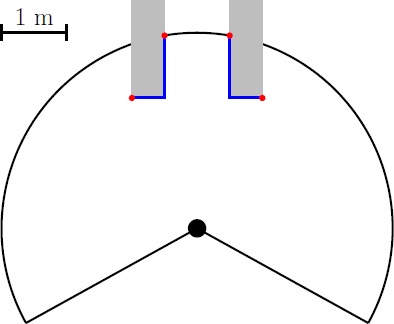
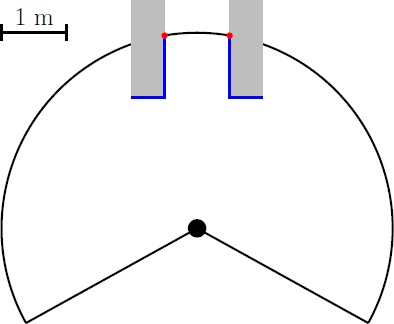
Then the change in the radii are evaluated: dr = r(i+1) - r(i). When dr>R then r(i+1) is saved, when dr<-R then r(i) is saved. A set-point can be set in between the two corridor points. However there are 4 points in this situation (see figure left below), the two central represent the corridor. Any outer point can be removed from the set (figure right below), this results in pairs of 2 corridor points (if there are more corridors spotted).


