EDrive: Difference between revisions
(Created page with '= EDrive in VirtualBox = The EDrive is a bootable Linux USB drive used in the Mechanical Engineering Bachelor course Signals 4CA00. It boots the Lubuntu distribution, which has …') |
|||
| (18 intermediate revisions by the same user not shown) | |||
| Line 1: | Line 1: | ||
= | = vEDrive in VirtualBox = | ||
The EDrive is a bootable Linux USB drive used in the Mechanical Engineering Bachelor course Signals 4CA00. It boots the Lubuntu distribution, which has a preinstalled version of Matlab and the measurement software QADScope. | The EDrive is a bootable Linux USB drive used in the Mechanical Engineering Bachelor course Signals 4CA00. It boots the Lubuntu distribution, which has a preinstalled version of Matlab and the measurement software QADScope. | ||
The EDrive can also be booted from VirtualBox. VirtualBox is a free open-source virtualizer that allows an operating system (OS) to be run as guest on top of a host OS. In this specific case it means that the EDrive can be run as a guest OS on top of Windows or MacOS (hosts). This document explains how to do this. | The EDrive can also be booted from VirtualBox. This can be done by downloading the vEDrive image (virtual EDrive). VirtualBox is a free open-source virtualizer that allows an operating system (OS) to be run as guest on top of a host OS. In this specific case it means that the EDrive can be run as a guest OS on top of Windows or MacOS (hosts). This document explains how to do this. | ||
The disadvantage of | The disadvantage of the vEDrive in comparison to the EDrive USB, is that the vEDrive doesn't connect with the E/Box hardware. Simulated Experiments, however, can be run from the vEDrive. The simulated experiments are ''loopback'', ''twomassspring'', ''massspring'', ''truck'' and ''twotone''. These simulated experiments are used in the final exam of the course. | ||
== Target Audience == | == Target Audience == | ||
This document is written for students who don't have a TU/e laptop and have trouble booting the EDrive USB from their laptop. Running the | This document is written for students who don't have a TU/e laptop and have trouble booting the EDrive USB from their laptop. Running the vEDrive as a virtual machine allows these students to be able to run the simulated experiments. | ||
== | == vEDrive Image == | ||
Download the | Download the vEDrive image for VirtualBox from:<br> | ||
<code>\\wtbfiler.campus.tue.nl\EBox\Virtualbox\vEDrive_signals.ova</code> | |||
'''Note that you have to be on the TU/e network to access the wtbfiler (VPN connection is also possible).''' | |||
If you are on a Mac proceed as follows: | If you are on a Mac proceed as follows: | ||
# Go to a finder window and type <code>CMD + K</code> (or go to <code>Go > Connect to Server</code>). | |||
# In the popup window type: <code>smb://wtbfiler.campus.tue.nl/EBox/Virtualbox/vEDrive_signals.ova</code>. | |||
# Copy <code>vEDrive.ova</code> to a local directory on your Mac. | |||
== VirtualBox Installation == | == VirtualBox Installation == | ||
# Download VirtualBox from | # Download VirtualBox from [https://www.virtualbox.org/](https://www.virtualbox.org/) and install it. | ||
[https://www.virtualbox.org/](https://www.virtualbox.org/) and install it. | |||
# Download the Oracle VM VirtualBox Extension Pack from [https://www.virtualbox.org/wiki/Downloads](https://www.virtualbox.org/wiki/Downloads) and install it. | # Download the Oracle VM VirtualBox Extension Pack from [https://www.virtualbox.org/wiki/Downloads](https://www.virtualbox.org/wiki/Downloads) and install it. | ||
== Importing the | == Importing the vEDrive Image in VirtualBox == | ||
In VirtualBox: | In VirtualBox: | ||
# Go to | # Go to <code>File > Import Appliance</code>. | ||
# Browse to the location where you saved the EDrive image | # Browse to the location where you saved the EDrive image <code>vEDrive.ova</code> and select it and then click '''continue'''.<br>[[File:EdriveVirtualBox1.png]] | ||
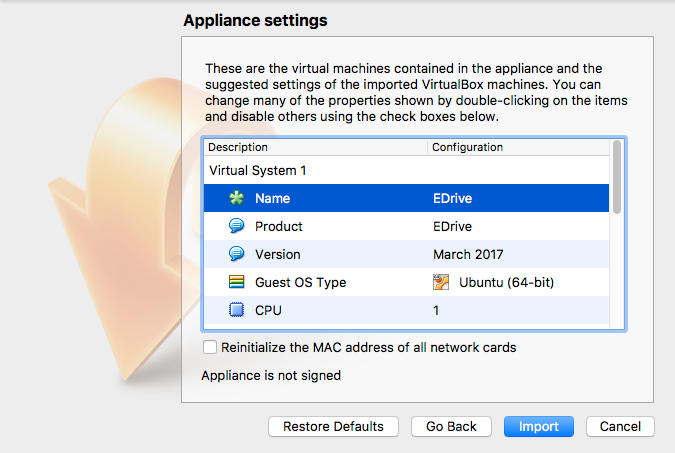
# In the next window you can modify some settings if you wish (e.g. RAM memory for the virtual machine). | # In the next window you can modify some settings if you wish (e.g. RAM memory for the virtual machine).<br>[[File:EdriveVirtualbox2.png]] | ||
# Click | # Click '''Import''' to import the EDrive image. Importing the image will take a couple of minutes. | ||
== Running the vEDrive in VirtualBox == | |||
To boot the EDrive in VirtualBox proceed as follows: | |||
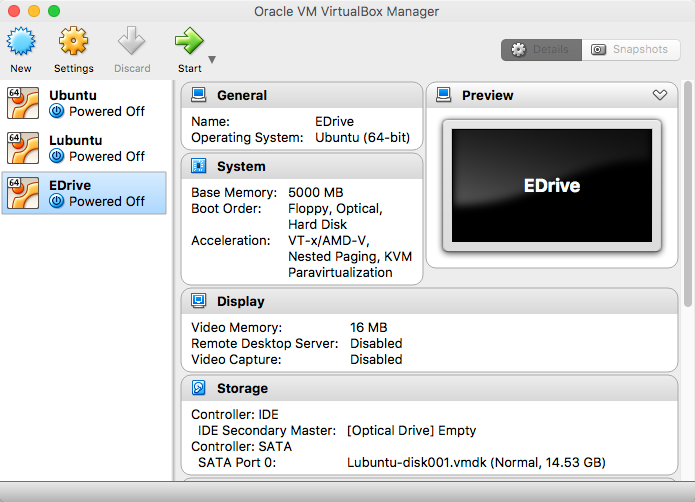
# | # Double-click the vEDrive image in the main window of VirtualBox:<br>[[File:EDriveVirtualBox3.png]] | ||
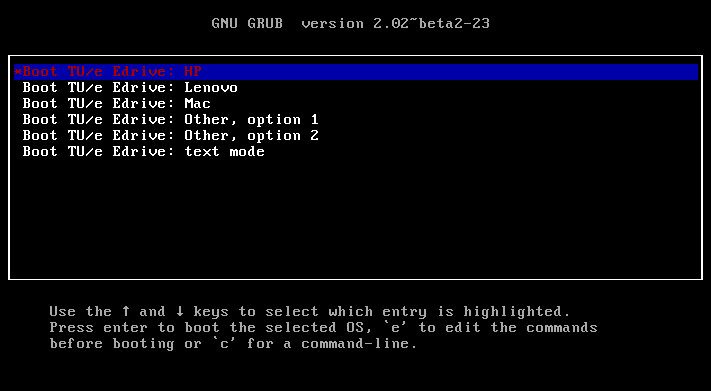
# In the popup window select the 1st option<br>[[File:GrubMenu.png]] | |||
== Internet Connection == | |||
You don't need to setup an Internet connection as the connection of your host OS (e.g. Windows or MacOS) will be routed automatically to the vEDrive's OS. | |||
== Matlab Activation == | |||
Matlab can be activated as follows: | |||
# Open a Terminal by going to <code>TU/e > Accessories > LXTerminal</code> | |||
# Type: <code>sudo matlab</code> and press the return key | |||
# Click '''Next''' in the popup window<br>[[File:MatlabActivation1.png]]<br> | |||
# Enter your Mathwork account credentials and click '''Next'''<br>[[File:MatlabActivation2.png]]<br> | |||
# Click '''Next'''<br>[[File:MatlabActivation3.png]]<br> | |||
# '''''Important!''''' the login name has to be ''''root''''.<br>[[File:MatlabActivation4.png]]<br> | |||
# Click '''Confirm''' and then '''Finish'''<br>[[File:MatlabActivation5.png]]<br> | |||
== Running Matlab == | |||
# Open a Terminal by going to <code>TU/e > Accessories > LXTerminal</code> | |||
# Type: <code>sudo matlab</code> and press the return key | |||
== Running the Simulated Experiments in Matlab == | |||
To run a simulated experiment you just have to type the name of the experiment (e.g. '''loopback''') in the workspace of Matlab. | |||
Latest revision as of 16:37, 5 July 2017
vEDrive in VirtualBox
The EDrive is a bootable Linux USB drive used in the Mechanical Engineering Bachelor course Signals 4CA00. It boots the Lubuntu distribution, which has a preinstalled version of Matlab and the measurement software QADScope.
The EDrive can also be booted from VirtualBox. This can be done by downloading the vEDrive image (virtual EDrive). VirtualBox is a free open-source virtualizer that allows an operating system (OS) to be run as guest on top of a host OS. In this specific case it means that the EDrive can be run as a guest OS on top of Windows or MacOS (hosts). This document explains how to do this.
The disadvantage of the vEDrive in comparison to the EDrive USB, is that the vEDrive doesn't connect with the E/Box hardware. Simulated Experiments, however, can be run from the vEDrive. The simulated experiments are loopback, twomassspring, massspring, truck and twotone. These simulated experiments are used in the final exam of the course.
Target Audience
This document is written for students who don't have a TU/e laptop and have trouble booting the EDrive USB from their laptop. Running the vEDrive as a virtual machine allows these students to be able to run the simulated experiments.
vEDrive Image
Download the vEDrive image for VirtualBox from:
\\wtbfiler.campus.tue.nl\EBox\Virtualbox\vEDrive_signals.ova
Note that you have to be on the TU/e network to access the wtbfiler (VPN connection is also possible).
If you are on a Mac proceed as follows:
- Go to a finder window and type
CMD + K(or go toGo > Connect to Server). - In the popup window type:
smb://wtbfiler.campus.tue.nl/EBox/Virtualbox/vEDrive_signals.ova. - Copy
vEDrive.ovato a local directory on your Mac.
VirtualBox Installation
- Download VirtualBox from [1](https://www.virtualbox.org/) and install it.
- Download the Oracle VM VirtualBox Extension Pack from [2](https://www.virtualbox.org/wiki/Downloads) and install it.
Importing the vEDrive Image in VirtualBox
In VirtualBox:
- Go to
File > Import Appliance. - Browse to the location where you saved the EDrive image
vEDrive.ovaand select it and then click continue.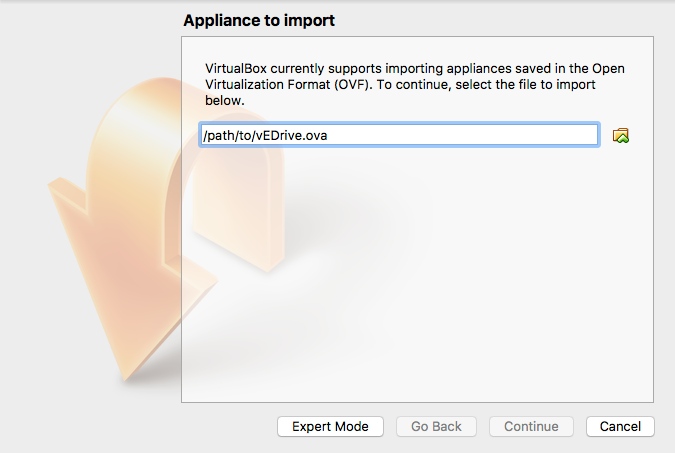
- In the next window you can modify some settings if you wish (e.g. RAM memory for the virtual machine).
- Click Import to import the EDrive image. Importing the image will take a couple of minutes.


Running the vEDrive in VirtualBox
To boot the EDrive in VirtualBox proceed as follows:
- Double-click the vEDrive image in the main window of VirtualBox:

- In the popup window select the 1st option

Internet Connection
You don't need to setup an Internet connection as the connection of your host OS (e.g. Windows or MacOS) will be routed automatically to the vEDrive's OS.
Matlab Activation
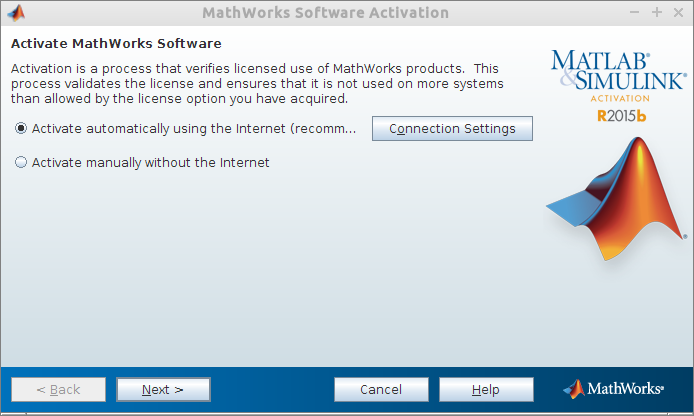
Matlab can be activated as follows:
- Open a Terminal by going to
TU/e > Accessories > LXTerminal - Type:
sudo matlaband press the return key - Click Next in the popup window
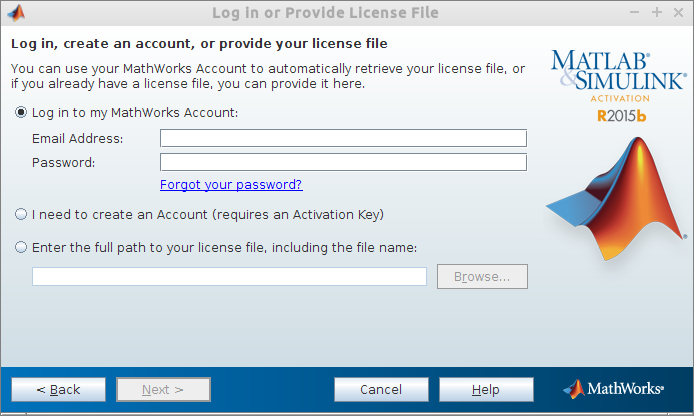
- Enter your Mathwork account credentials and click Next
- Click Next

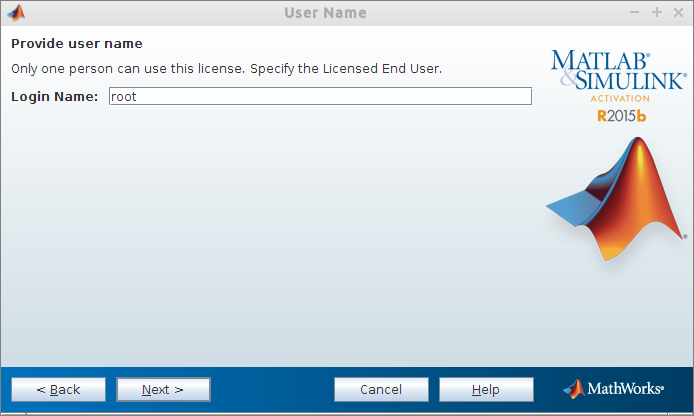
- Important! the login name has to be 'root'.
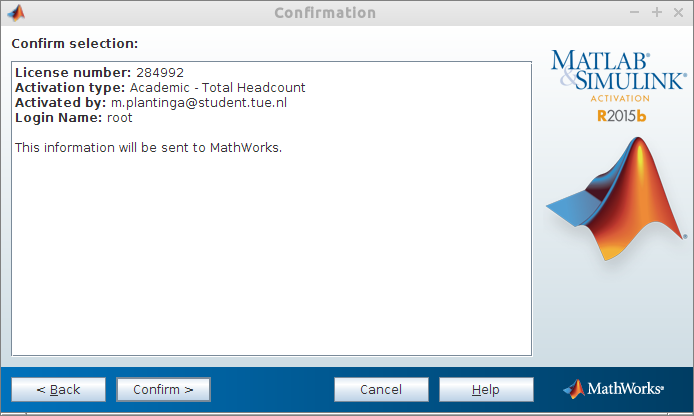
- Click Confirm and then Finish


Running Matlab
- Open a Terminal by going to
TU/e > Accessories > LXTerminal - Type:
sudo matlaband press the return key
Running the Simulated Experiments in Matlab
To run a simulated experiment you just have to type the name of the experiment (e.g. loopback) in the workspace of Matlab.